Apple Watch Series 6 Tips & Tricks - How To Use The Apple Watch Series 6 By DHTV
Hey everyone welcome back. This is Dan from AHTV, and today I'm going to be showing you some Apple Watch Series, six tips and tricks to help you get the most out of your Apple Watch as always, there's a link in the description to more great tips and tutorial videos on the Apple Watch. So if you're looking to learn more check it out, let's get started all right, so we've got the Apple Watch Series 6 and the iPhone 12 Pro, but a lot of these tips are going to work with pretty much any Apple Watch or iPhone. You have some are going to tie in together, we're going to jump right into this, and we're going to open up our settings, application on the Apple Watch here, and we're going to scroll down to general and then tap on wake screen now by default. This screen actually will wake and stay on for 15 seconds, and then it's going to turn off now. Personally, I find that not to be enough time I like to have it on a little longer, so you can set it to stay awake for 70 seconds.
Now you have the return to clock. You can also set this up to always after two minutes after an hour or after the crown press. So that's also a little more customization. You can use with how this watch is going to work. The next tip is super useful for me, and for this we bring in the iPhone.
If you ever lose your iPhone, you can actually use your Apple Watch to find your iPhone, and it's really useful, because I constantly lose my phone in the couch or whatever you're just going to pull up from the bottom from your watch face screen and this little option right here is going to ping the iPhone if it's in range, and it's connected obviously, and you'll, be able to find it if you're wearing headphones. It is going to be a little loud, I'm going to tap on that three two ones. So that's the ping sound, and that way you can hopefully find your iPhone again needs to be connected to. The Apple Watch has to have battery life. Obviously- and it has to be in range for the next tip- we're opening settings again, this time we're going to scroll all the way down to where we see noise- and this is all about protecting your ears, so environmental, sound measurements is off by default.
If we tap on that, what it's going to do is alert you. If the sounds around, you are above a safe level that could lead to a hearing problem, and it's pretty important. I mean we don't realize that things are a bit too loud. So if you turn this on you'll get a little notification. That'll tell you: if that's the situation, and maybe you can either cover your ears a little or get away from it if you're too close to a speaker or something like that, so it's a good feature to have on, especially for your ear health.
The next tip again for this one we're going to open our settings, application we're going to tap on general we're going to scroll down a little here until we see screenshots. This is going to allow you to take screenshots on your Apple Watch. We'll turn that on and now all we have to do is press on the crown and side button simultaneously. It takes a little screenshot for you and now on our iPhone. We can actually view that screenshot we just took the next tip is more for comfort and where you, where you watch on the left or your right wrist, so we're going to open our settings up once again here we're going to scroll down and tap general, and we're going to go and tap on orientation.
Now we can change which wrist we use the watch on. I have it set to the left. You can tap right. You can also switch to the digital crown section here and have the digital crown on the right or left, depending on how you have it positioned on which wrist, if it's more comfortable for you, so you can set that up as well. That way the watch works as it should in the position you're wearing it.
In now the Apple Watch is pretty small. So if you are having trouble seeing different things on the Apple Watch, you can open the settings here once again, we're going to go through a few settings display and brightness being the first one you can set the brightness to make it a little brighter. You can also change the text size here, so you can bold the text. It's a little bolder. You can tap on text size and increase it or decrease it, depending on what you'd like to do.
I traditionally just leave it on the standard that it's on, but there are some other options here. If we go back a little and if we go to the accessibility setting now from here, we have Zoom and by default that's off. If we tap on it and then turn on the zoom when this is on, you can double tap with two fingers to zoom and then rotate the digital crown to adjust your view. So, for example, on our watch face here, we'll take two fingers. We double tap it zooms in.
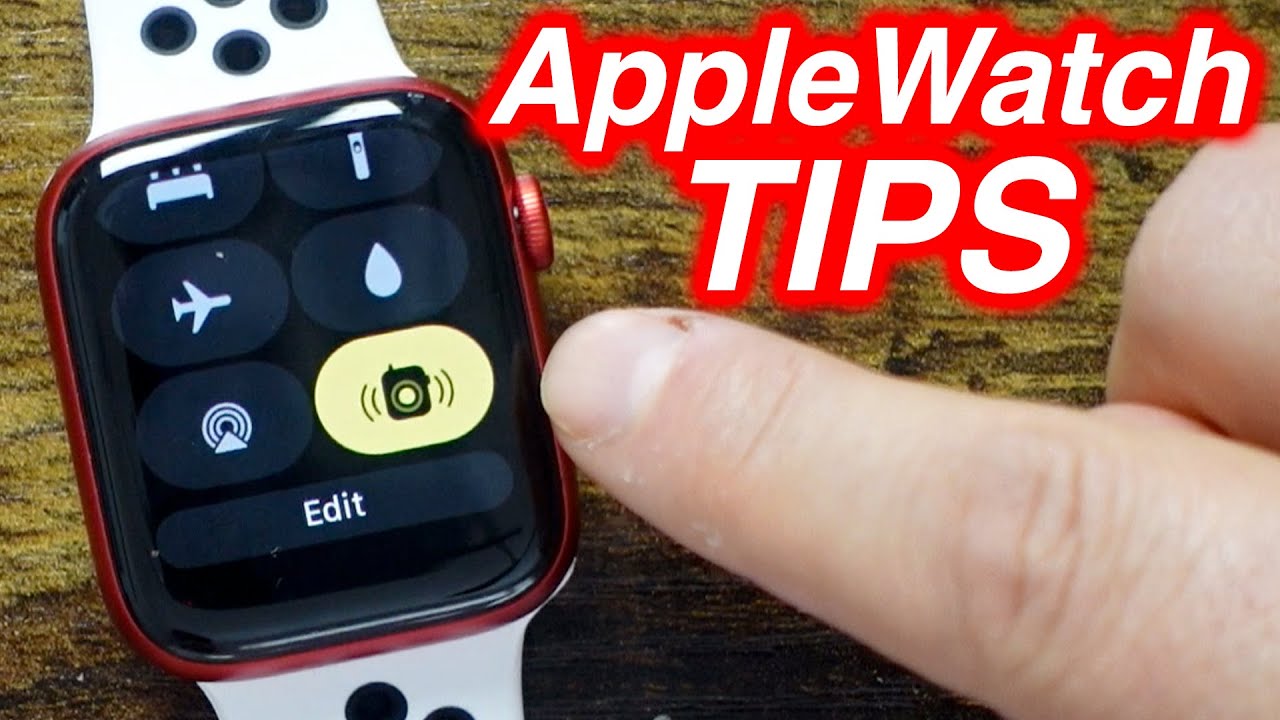
We can then use the crown to sort of adjust back and forth where we are and then to zoom back out just double tap again with two fingers and that's going to be good. If you're having issues seeing different parts of your Apple Watch, the next one is a little basic, but that's accessing your control center. Just swiping up from the bottom of your Apple Watch gives you a bunch of settings here. So first off you can see the percentage of your battery, your Wi-Fi, you have the notification. So if you turn that on it turns on silent mode, so that's how you silence the Apple Watch and there are settings within the settings app that you can configure how it works on silent, whether it's vibrating or off completely.
We have some options here, so that means that we can set up theater mode which turns on silent mode and keeps the screen dark until you tap the screen or press the digital crown. So that way it doesn't light up while you're in a movie theater and things like that. We have done not disturb. We have a flashlight which is a very bright sort of light on the front of the Apple Watch, and you can just swipe across it's going to give you sort of like a SOS kind of flashing light and then a red light there as well. So that's an option as well, for you scrolling down a little more.
We have the night mode. So if you're going to sleep, you can turn that on airplane mode. This one here, if you do have it underwater or anything like that, you can actually press on this. It's going to sort of flush out the Apple Watch um. Somehow it has technology built inside on how it's going to do that right here, we're getting the information, the digital crown to unlock and eject water.
So we're just going like this goes through whatever process it does, and it should flush out any water. So it's good to do that, especially if you've been washing your hands a lot and waters got in or even if you forgot it on, and you took a shower or something like that all right down here. We have this option right here. If we tap on that, you can then see what is connected or how to connect to a device. So we have the air pods right here.
If they were opened up, we can then connect to them. You'll see other devices there as well, and then this one right here is the radio mode. So if you turn that on or off it's going to allow you to use that as well, if we tap edit here, we can actually remove or even move them. So if we hold our finger, we can move them around. So if you find you use the flashlight a lot more, we can take that upwards as well.
If we don't want something there, we can move it there's more right here, so we tap the add, we've added that option as well, and if we tap on that, you can see this is school time now. What this does are it's going to block apps and complications. It also turns on do not disturb. However, emergency calls and notifications will break through. I actually have never used that feature, I'm not going to keep it there because it doesn't apply to me very much, but it is there if you do plan to use it next, one again we're going to open our settings.
This one is going to work with Siri, so we're going to scroll down to where we see Siri in the settings, and we have three options on how to access Siri. So whether it's pressing on the crown here, pressing and holding using the key word right, there hey, you know who or raising to speak. So if you want to turn any of these on or off, you can just use the little swipes on these little three tabs here. You can also reset the Siri history here, so you can delete history if you don't want it to because apple's actually collecting this. For whatever reason, I'm not sure if you have the different languages, so mine right now is set to Canada.
You can actually do this on your iPhone as well. It's not just specific to the Apple Watch here, but you have always on for voice feedback. You can control it with silent mode, headphones, only speaker volume. So whenever Siri speaks, you can lower the volume right there. If you don't like it to be too loud, and then you have maps as well, so totally up to you how you configure this, but for me, I leave all three on, but it is good if you find that this is triggering especially the hey you know who trigger.
I find that sometimes it's a little annoying, because I don't really use that trigger with this. If I'm specifically using Siri with the Apple Watch, I use the crown otherwise it's you know focused in for my iPhone the next one again in our settings. This one is going to be very important, especially for your health and safety, so we're going to scroll down to where we see SOS right here, we're going to tap on that, and you can see that hold the side. Button is going to enable the SOS where it can call emergency services, and things like that. You also have the fall detection, which is disabled right now, and I would strongly recommend that you turn this on.
This is going to initiate an emergency so if you take a hard fall and don't seem to move now before the call actually goes through Apple Watch is going to alert you I'm not going to test it here, but you can read through what it's going to do and how it's going to work. But basically, if you do fall, you don't move it's going to call them, and then you can actually get help. So I'm going to turn that on right here you can read through that and tap confirm, and now, if I ever fall, this is going to trigger fall, detection and SOS call. Medical ID is also important. Tap on that you can see what you have set up.
You can use the health app on your iPhone to set up medical ID, that's sort of giving the medical emergency service providers' information if they do find. Let's say you're in a car accident knock on wood. They have this information, and can treat you best with anything that you might have allergies with your height weight. All that kind of stuff will be in there. So it's good to set that up as well back over to settings here we're going to scroll down just a bit your battery.
These things have decent battery for what they are, but you can always check your battery. You can check the usage. You can see the power reserve option here. So if you turn that on it's going to prolong the battery life of the Apple Watch, and it's going to turn off pretty much all the features except the time to preserve as much battery as possible, you can also turn this off by pressing and holding the side button there. But I'm going to cancel that out for now.
If you ever need it, it's there. If we tap on battery health, you can get an idea of what that is and how it works very similar to the iPhone right here how that works and optimize battery charging. I leave this on. Basically, it's going to try to get to know your habits and how you charge the phone and sort of ramp up the charging closer to when you wake up in the morning, rather than having it sit at 100. Constantly charging that'll help save the battery life in the long run, so turn that on.
If it's off it should be on by default, but that's important as well. We scroll down you have your blood oxygen. You have all these features. I strongly recommend that you go through each one of these set them up so that way it works exactly how you want. I mean you paid good money for this thing, so you might as well just go through each one and just set them up, but these are some tips and tricks that I use, hopefully they're helpful for you and useful for you.
If you have any questions, feel free to ask me in the comments, as always, there's a link in the description to more great Apple Watch tips, tricks and tutorial videos. So, if you're looking to learn more check it out, if you enjoyed the video hit, the like button subscribe to the channel click, the bell notification box to be notified. When I post new videos and if you'd like to help support the channel, the Patreon link is in the description as well. Thanks for watching I'll see you guys next time.
Source : DHTV
Phones In This Article
Related Articles


Comments are disabled
Latest Articles


