Acer Chromebook C720/C740 Battery, Keyboard Assembly and Motherboard Replacement Procedure By Screen Surgeons
This is Eugene Patrick, which I'm the laptop screen doc in the name of the website is WWE surges calm. Today we have an Acer, c720 and C 720 Chromebook model, and I'm going to show you how to replace the keyboard assembly the battery and the motherboard for both with C 720 and a C 740 Chromebook models. Okay, so this particular one is actually C 720 and the C 740 is almost identical to it. The parts are almost identical, for the procedure is the same. There are some differences, and I'll point out those differences as we go along. So the first thing before we start is you want to make sure that the laptop is off every time you open and close the Chromebook it turns on.
So you just press long press the power button to turn off next. We flip the Chromebook over and on the bottom. There will be 12 screws of three rows of four screws each, and you have to remove these screws. I already remove these screws to make the video shorter, and I'll quickly show you the tools that I'm going to use. So we have a metal spider tool to pry things open.
We have an exact knife or a hobby knife. It's also we're going to use it for prying and lifting adhesive tape, a pH one, electronic screwdriver, and that's to remove these 12 screws from the bottom and imperf paramedic tweezers to manipulate cables. So once we remove the screws we want to pry. The bottom cover off. One way to do is to stand the laptop on this side, and you want to get into the seam and between the bottom cover and the keyboard assembly.
So we want to do sometimes it's hard to get in. So we want to do is put open the seam using this hobby knife and once you have enough space just put open the seam. You just use the spider to go around the laptop, and I've removed the spot-on cover several times, so this one's a little easier for me to remove but uh it might take several tries just to go around the seam and to open it up. So this time the cover just comes right off. So once you remove the cover.
The first thing that we can remove is the battery inside to do that. There's only one connector on the battery and there are two screws that need to be removed. One is here, and then the second one is the second one is right here so one here in the second one here, so we remove the connector and lift the battery. The battery part number is a P 1, 3 J 4 K. This particular battery model works both for the C 720 and C 740.
So if you only need to change the battery, stop the video right here and with that, so we have removed the battery. We do have these batteries in stock, to add screen surgeons and to buy them, go to our website and either go to the link on the top. These testicles or there's also form for you to fill out on the front page. Awesome, ok! So next, in order to get to the keyboard assembly, we have to remove the motherboard next so to do that, make sure you're in a properly grounded environment either touch a metal part or not. Wear shoes or just have a grounding, strap on you or grounding that or anti-static mat.
So there's a total one, two three and so far I only see three screws. So we're going to remove these three screws. First, one and we'll put these screws in the file and one two and three. So we put the screws out next, there's the Wi-Fi connection to cables. We snap off the Wi-Fi connection, cables and then there's the video cable connects to the screen.
We pull out the video cable and this is taking a little more time than usual and the reason is there's some adhesive tape here. So we remove the adhesive tape and the video cable comes out easily. So next time remove the adhesive tape and then cable comes out easily there's another cable here and that's for the capacitor or that's the vibrator rule setup. Finally, there's the speaker cable. So we want to lift that up, and so we pull out the speaker, cable.
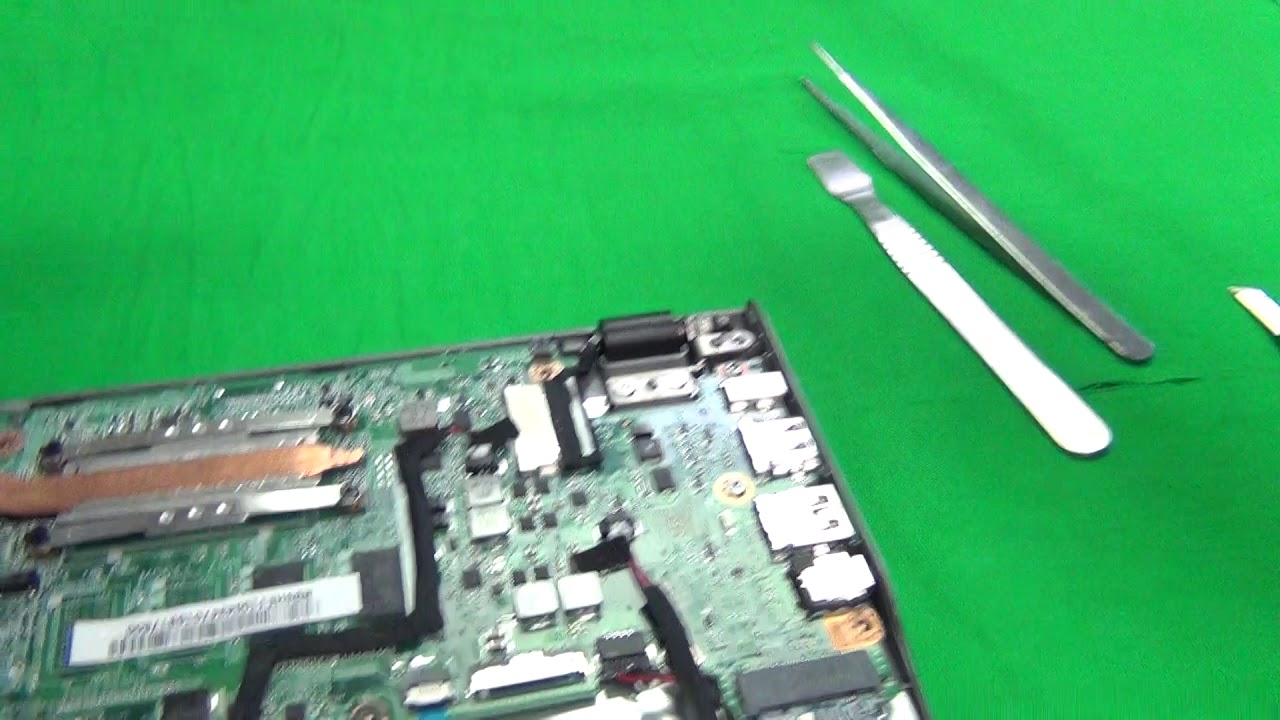
Okay. Next we have the 16 gigabyte memory card. We want to remove the screw for the memory card, and we remove the memory card so that the motherboard extracts things here and the fan and the heat sink also has its own screw. We remove that and gently start lifting at the motherboard and when we do that, we see we have one more screw here. Look that up and disconnect the keyboard connectors.
We lift the bars up one and two and remove the keyboard connectors, so actually there's quite a little stuff. So if the motherboard is not moving just check, what else is needs to be lifted? And when we do this, we start working the leather board up and see if anything else is getting in the way, and we see that the fan, cable or the fan as its own screw. Here we remove that and once we do that, the motherboard starts to lift. So once we free the cables, the motherboard, the lifts and there's one more connector. Here we remove this connector, let's go, and the motherboard is out.
So this is how you remove the motherboard, so it took a few steps longer than I thought, but the motherboard is free right now. So next we just have the keyboard assembly and the screen assembly. We need to separate the screen assembly from the keyboard assembly, and you do that by removing the screws from the bottom of the hinge. So there's one and two and one and two okay, so we again put these in a separate pile. So we separate the screen assembly from the keyboard assembly.
There's some a Wi-Fi cable. We have to unwrap, and we put the screen assembly outside. So now we have the keyboard assembly separated okay. So if you order a replacement keyboard assembly, it will look like something like this. So there are speakers, you need to transfer the speakers in a couple of circuit boards, this USB board here and this board down here and then once you do that you can start reassembling the laptop okay for the keyboard assembly, there's something there is a difference between the C 720 and the 740 models.
The c720 models has a model, has a square chip on the tracker pad on the bottom, and the C 740 model has a rectangular chip on the tracker pad on the model so of the c720 this keyboard. We only work with the c720 models. However, if you get the keyboard assembly for C 740 with there a tank or chip, it will work for both the C 720 and a c7 40s. This is the one we have in stock once again to buy. This part from us, go to www.
hsn and click on schools. Okay, so once you know what your part number is and get the right keyboard assembly transfer, all the parts from the keyboard assembly put the motherboard back in reconnect all the connectors. As shown you reconnect the screen assembly screwing, all the screws put the battery back in screen the screws for the battery. You reconnect the battery and snap the bottom cover back on: okay, okay, one thing that I think I didn't be quite right. Is this connector it pulls out.
So what I did is I believe I pulled out the cables instead of the connector. So it could just come out, so what you can do is there's some plastic tabs on the sides, and you just use your hobby knife in the fingernail. Just pull this connector out. If you do happen to pull the pins out of the connector there. Pins are relatively easy to reconnect and that's what I'll do after the video.
But just so you know next time you can pull this connector out. Okay, that's it! Once again, my name is Eugene Patrick couch on the laptop screen doc, and they on the website is WWE and calm. Thank you very much. Good luck.
Source : Screen Surgeons
Phones In This Article
Related Articles
![🔥 Apple Watch Series 7 BREAKDOWN [2021] - Release Date, Price & more!](https://img.youtube.com/vi/-Q7E1bkJ5Ds/maxresdefault.jpg )


Comments are disabled
Latest Articles


