The Mi Mix 3 is cooler than you think... - Teardown By JerryRigEverything
This teardown is sponsored by NordVPN. Watch till the end to get a 75% discount and a free month. The Mi Mix 3 is a unique slider phone with the physically hidden front facing cameras. One thing I did notice while charging the phone up for this video was that the cable in the box is specifically designed and formed for this phone, allowing the screen to slide while charging. But, while using a third party cable, the screen is stuck in the closed position. Kind of interesting.
It's time to take apart the Mi Mix 3 and see what kind of magic is holding the whole contraption together. Let's get started. Since the Mi Mix 3 isn't water resistant, we can always hope it won't be glued shut quite as tight as some of the other water tight phones. A little bit of heat gets the phone hot enough to soften the adhesive between the glass and the frame of the phone. I can use my suction cup to pull up on the glass slab and slide my razor, or metal pry tool, underneath to slice away the adhesive holding the two portions together.
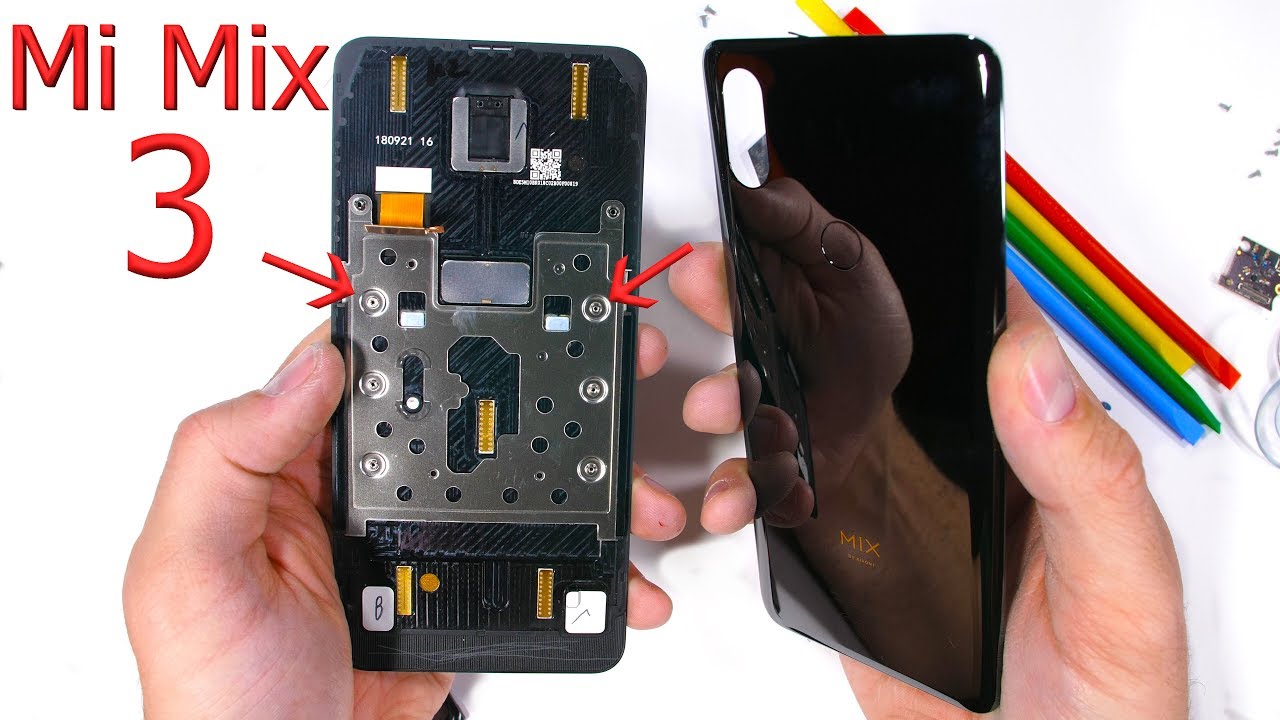
It kind of makes you miss the good old days when all you needed was a screw driver... but, it is what it is. The back glass panel does pull away easy enough. I'm taking special care not to put any stress on the fragile ribbon cable connecting the fingerprint scanner to the board. I'll reach my plastic pry tool in there and unsnap it like a little Lego.
Then the back glass can fold away from the phone. It kind of looks cool inside with the black plastic and gold antennas. The wireless charging coil is still connected to the rear glass and covered with black plastic on both sides. So it's not quite as aesthetic as Google's copper colored coils on the Pixel 3. And we also have what's probably the NFC pad up here at the top, attached to the back glass.
Xiaomi does have not one, but two, warranty void stickers... which means we better stop the teardown. Just kidding. With 9 normal Phillips head screws holding down the top protective plastics, we can finally unplug the battery and make our way down to the magical pull tabs poking up from the bottom. I'll get to show you exactly how the magic happens with these pull tabs because one did end up breaking.
They are unfortunately silent, but do their job for the most part, hypothetically allowing the battery to release without putting any stress on the pouch itself. If the fragile pull tab doesn't break during the pull, of course. Now that the battery is out, you can see how the adhesive reacts when tension is applied to the white strip. It loses it's stickiness and pulls out from underneath the battery easily, while leaving no reside behind. The longer the battery has been installed though, the more brutal these become, and the easier they break.
But still, pull tabs are better than the permanent adhesive alternative. Inside the Mi Mix 3 is a 3200 milliamp hour battery. After the battery's removed, we get our first glimpse of how the sliding mechanism works. Two rather large rectangular magnets. You can see how it pulls the metal screw into the center with it's magnetismic force.
I don't really know how magnets work. The screen ribbon flexes with the motion of the slide, kind of like what we saw with the Vivo Nex S's motorized camera from last year. We got to go deeper though. So the 7 Philips screws surrounding the bottom plastic plate are next. The plastics that pull away include the...... include the loud speaker with the two square golden contact pads.
These allow for communication with the motherboard. I still think the black and gold accents are kind of fun. I'll remove the one silver screw from the charging port board, and unplug the white wire cable. Then unclip the bottom extension ribbon. This allows the small board to fall out of the phone frame.
It's got the standard USB-C port, along with the microphone, but no headphone jack. Those are getting more and more rare these days. All that's left in the bottom part is the cute little coin-style vibrator motor, but we'll leave that in place for now. The motherboard up top is where some cool stuff is happening. Basically all the connectors have this copper grounding tape over the top.
I imagine that with the sliding motion of the phone, the internals are constantly feeling sharp jolts and the screen jerks up and down. So the tape probably helps keep the ribbon intact and plugged in. Each of the 4 camera connections are unclipped, and there are 3 little silver Phillips head screws holding down the motherboard. The 2 front facing cameras come away next – a 24 megapixel and a 2 megapixel sensor that allow for the blurry background portrait mode thing. Both housed in the same metal housing.
The dual SIM card tray comes out next. This would probably also make a good step number 1 if you like doing things in order. Finally I'll unclip the screen ribbon surrounded by red rubber, which I assume helps support the cable as it constantly flexes and moves with the sliding motion of the phone. Xiaomi has said that they've tested the sliding motion over 300,000 times with no ill effects on the hardware. And it does look like they have taken extra precautions from the inside, which is nice.
Gray dollops of thermal pates on the back of the motherboard transfer heat to the metal frame of the phone. There is also a white hexagon shaped water damage indicator sticker next to the SIM card tray. This will turn pink if the phone ever gets wet. And now the rear facing cameras – both with different functions. The normal 12 megapixel sensor does have optical image stabilization, but the 12 megapixel telephoto camera does not.
Both are mounted in the same metal housing. We didn't come all this way to stop here though. That sliding motion still needs to be explained. Underneath the long black extension ribbon, we reveal a third set of yellow tape covered screws, which I'm pretty sure all attach the screen into the body. I'll peel away each of the 3 yellow tape strips and unscrew the 8 super flat Philips head screws, similar to the same sidewall screws we saw back in the iPhone 4.
The Mi Mix 3 has 28 screws inside, so I'm definitely keeping them all organized off to the side, so I can hopefully put the phone all back together again when I'm done. After the last 2 top screws are removed, I can very gently slide the screen ribbon out through the hole in the phone housing. And we've successfully removed both halves of the phone. The design of this thing is so simple, it's brilliant. A little trick I saw on Marquez's channel was this magnet paper that shows us where magnets are hidden inside of electronics.
Two large rectangular magnets in the main body of the phone, and down here we can also see it's picking up the little tiny magnet inside of the vibrator motor. Then over here on the screen half of the slider, we have another 2 main magnets. The silver sliding rack itself on the screen side is completely free floating – no springs or resistance. It slides up hitting the large rectangle, and then slides back down and locks out with the little silver tabs bent up, hitting the ends of the plastic rails. These blocks keep it from extending too high up and too far down.
Obviously the thin AMOLED screen is glued into the other side of this thin piece of plastic, and it is replaceable with enough heat. The little gold screen ribbon just pokes through the hole in the back of the plastic. Now you might be thinking to yourself, 'Hey Jerry, don't magnets spend all their time attracting each other? How does the slider stay open if the magnets are the only thing inside of there?' Well, I'm glad you asked. As you can see, when the slider is in the closed position, the magnets line up directly over top of each other with a large amount of attaching force. But when I slide up, the magnets move from the initial attracting magnetic field, into a position where the magnets are actually repelling each other and pushing away from each other, holding the screen in the upward, extended position.
This is pretty brilliant because there are no motors, springs or crazy complicated hardware to get jammed or misaligned – just simple magnetic fields. Let me show you. I have two super strong magnets here. Strong enough that they want to attract through my finger. I'll put them on either side of my metal pry tool.
The north end of one magnet is currently very strongly attracted to the south end of the other magnet. But let's say I move the 2 magnets so that they're next to each other. They start to repel – pushing away. Just like the position of the magnets in the phone when the slider is open. But when the slider is closed, the magnets line back up again and attract each other into the down position, keeping the slider tightly closed.
The fun sliding effect you feel with the Mi Mix 3 is that feeling of magnets passing from one attracting magnetic field into the repelling magnetic field. It's pretty smart of Xiaomi. I mean, so far, this is the only phone I've taken apart in 2019, but with this kind of ingenuity, we're off to a good start. I'm definitely going to need y'all to collectively cross your fingers now, in hopes I can put all 28 screws back into place with everything still working. I'll make sure the yellow tape is back on top so the screws won't jiggle loose with the jarring motions of the slide.
The motherboard can set back into place with it's red rubber protecting the screen ribbon cable. And all 4 of the camera units get plugged back in with the 3 silver motherboard screws holding everything down. Then I'll set the charging port down into the frame next to the small vibrator. The rest of the install is super straightforward, with the super long extension ribbon cable running under the battery, which also then gets set into place. And then the camera lenses and all the plastics get screwed down with all those screws I kept organized earlier.
The last step is the fingerprint scanner ribbon, and the back glass panel getting set back onto the phone. And lucky for us, the whole thing does still turn on, and slides up and down just like it did out of the box. This is partially due to the pure simplicity of the design and also because you had your fingers crossed the whole time. Thank you. I agree with Xiaomi that the sliding mechanism is indeed secure.
And with no moving mechanical parts, it's probably going to last for a very long time. Speaking of secure things, huge thanks to NordVPN for sponsoring this video and making the teardown possible. You've probably heard of a VPN at this point since you're on the internet right now. A Virtual Private Network allows you to encrypt your Internet traffic and change it from one location to another. It's super important that all your personal information is unobtainable and untrackable, especially when using public Wi-Fi at hotels or restaurants, or even at home.
With over 5,000 servers in 62 different countries, NordVPN is rated the Number One virtual private network by PC Magazine, and can secure 6 different devices, like cell phones and computers, all at the same time. For a free month and a 75% discount off a 3 year plan, use the discount code: jerryrig. It ends up costing just a few cents a day. NordVPN. com/jerryrig.
I'll put the link in the description. Would you ever use a slider phone, or would you rather everything be in one solid piece? Let me know in the comments. Come hang out over on Twitter and Instagram. And thanks a ton for watching. I'll see you around.
Source : JerryRigEverything
Phones In This Article


Related Articles


Comments are disabled
Latest Articles


