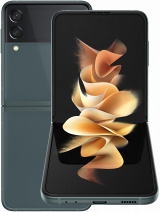
Samsung Galaxy Z Flip 3 5G Disassembly Teardown Repair Video Review By PBKreviews
You're watching the Samsung Galaxy z, flip 3, 5g, disassembly, if you want to see more videos like this, make sure you like subscribe and click on the notification bell, so you'll be notified the next time I upload a video and if you need any tools, there are links in the description first, the sim tray needs to be removed. Now we need to use a hair, dryer or a heat gun to apply heat to both sides on the bottom and top, and then we're going to use a plastic pry tool to pry them off once the outer screen glass portion is separated from the frame we're going to lift it up towards the top, but don't pull it off completely. Yet, since the cable for the screen is still attached to the board, there are two Phillips screws. We need to remove one locator over here and one over here which is holding down this metal cover over here. Now we can lift and remove this metal cover. Now we can disconnect the battery cable on this side.
Now, once that battery cable is disconnected, we can remove the plastic cover over here covering the connector for the outside screen, and then we can disconnect the screen cable. The two glass lens covers over here for the cameras are held down with adhesive. So if you ever happen to crack those and needed to replace those, you can just heat them up and gently pry them off. The screen is located on this portion over here and here's a look. At the other side, there are nine Phillips screws which need to be removed.
There are two 5g millimeter wave antennas. One is located over here and one is located on this side. This one over here is held on with some adhesive, so we're going to gently pry it off once we disconnect the flex cable. Here's a better look at the 5g millimeter wave antennas. It's time to remove the top plastic cover.
Here's a better look at that! There's some graphene film over here, which we need to peel off. That's covering some connectors. Now we can go ahead and disconnect the rest of the cables. There's a metal bracket over here which we need to remove by the fingerprint reader. Now we can lift and remove the fingerprint reader and power button.
There's a rubber gasket around this cover and here's the fingerprint reader itself and the power button, and the clicker is here underneath the selfie camera cable cannot be disconnected. However, the selfie camera itself is glued in place. Now we can lift and remove the main board. This board is a multi-layer board design. The 12, megapixel wide and ultra-wide lens are located over here.
The LED flashes over here and there's a secondary microphone located over here. On top on the back side, we can see the sim reader located over here and there's a graphite pad over here on top of the shields, and the two camera cables over here can be disconnected by just popping them off. There's also a proximity sensor located over here once that graphite pet is peeled back. We can see thermal paste on top of the ram and processor. Here's a better look at it with some thermal paste cleared off underneath the motherboard there's a 3d graphite layer over here which helps transfer heat when it comes to removing this battery located over here there are no pull tabs to help you pry it off, so we are going to need to use some isopropyl alcohol and apply some around the edges of the battery and let it sit there for about a minute, so it eats away at the adhesive underneath making it easier to pry it off.
Here's a better look at this battery and here's the other side. There are three magnets on this side of the flip. The earpiece speaker is located over here, and it's held down with some adhesive and the flex cable for the volume keys is located over here and is held down with some adhesive. So if you want to replace that you'd have to just gently pry it off here's the glass backplate and there's a graphite pad over here on the back. There are seven more Phillips screws on this side which need to be removed, there's a metal bracket or cover which needs to be removed once that's removed.
We can disconnect the battery cable. Now the wireless charging pad and NFC antenna cable can be disconnected. Here's a better look at that. The bottom speaker assembly can be lifted and removed on this speaker assembly over here in the corner. There are the white foam balls.
Here's a good look at the speaker. There are two more flex cables on the sub board, which need to be disconnected and then there's one more Phillips screw over here next to the charger port which needs to be removed. At this point, we can lift and remove the sub board. This flex, cable over here is attached, underneath which we need to disconnect on this sub board. The charger port is located over here and the primary microphone is located over here.
Here's a look at the other side. This flex, cable over here connects the sub board to the battery over here, as well as the wireless charging coil over here, and then it goes through. This flip over here comes out the other side and connects to the main board. There's a rubber gasket over here and over here, which they refer to as cured in place. Gaskets and those basically help keep water out, as well as holding those flex cables in place, while still allowing slight movement.
When you open and close the flips, the battery on this side also does not have any pull tabs to help you pry it off. So we're going to have to use some isopropyl alcohol on this battery as well. Here's a better look at this battery on this side of the flip. There are four magnets one is located here, one over here, one on this corner and one on the other corner. The foldable screen cable is routed through this opening over here and the vibrator motor is located over here and is held down with some adhesive there's.
Also, a rubber gasket over here for the speaker, opening and one over here for the microphone when it comes to removing the foldable screen over here, the borders around the screen are held down with some adhesive, so we need to apply some heat and pry those off. So here's that plastic border there is adhesive underneath the screen holding it down as well, so I have to apply heat to it and gently pry it off. So here's a look at the screen once it's peeled off around the area. The screen folds there are metal fins running down from one side to the other, which basically gives the center of the screen where it folds some support. Underneath the foldable screen on the frame over here there's a 3d layer of graphite, there's also some graphene film over here on this side.
Once those are peeled back, we can see the hinge underneath as far as repairability goes on this phone. I give it a 4 out of 10. Now I'm going to put the phone back together do so once everything's back in place flip over the phone power it on, and you're done. I hope you guys enjoyed this video and, if you guys want to see more videos like this make sure you like subscribe and click on the notification bell, so you'll be notified the next time. I upload a video thanks again for watching guys, and I'll see you guys in the next video you.
Source : PBKreviews


