Nokia 9 Teardown! - How do all these Cameras work?! By JerryRigEverything
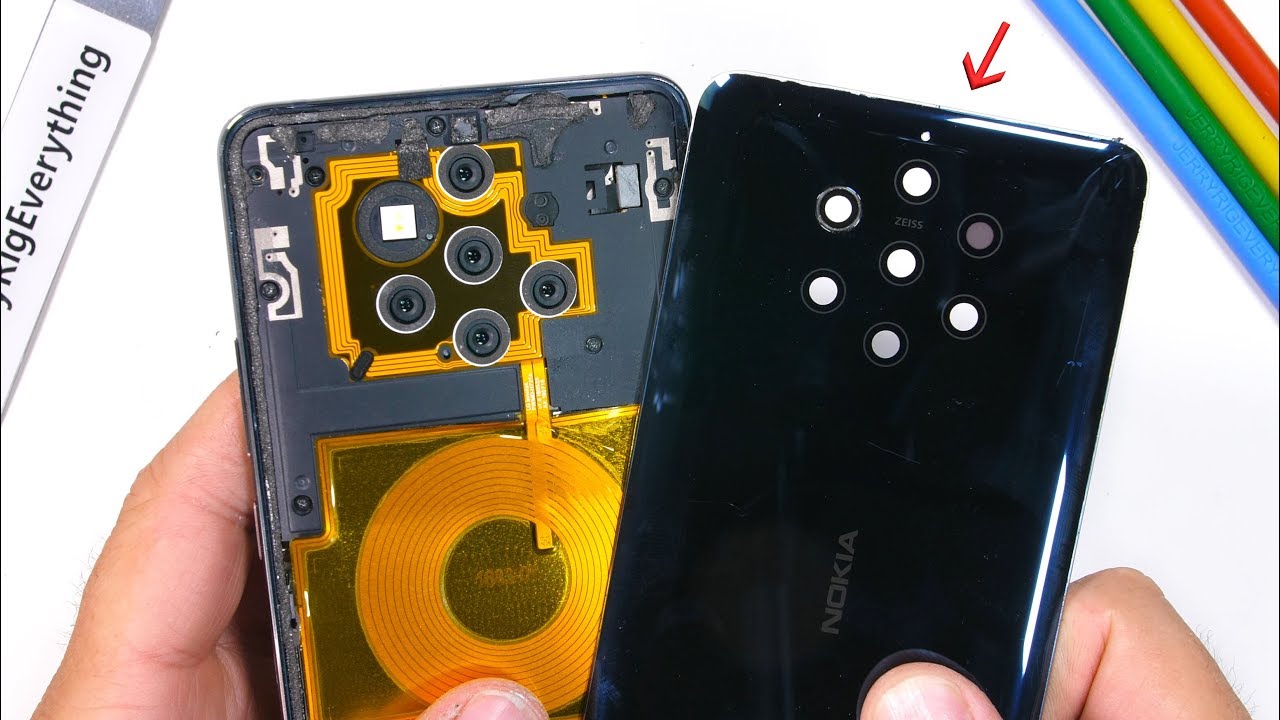
The Nokia 9 PureView – the crazy smartphone with one selfie camera in the front and 6 cameras on the back. Talk about overkill. Holding this baby up to your ear, you'll look like the outside wall of a high security detention center. Today we're going to see what it all looks like from the inside. This video is sponsored by Audible. Let's get started.
As with most glass backed smartphones, we're going to start with the heat gun. The thing that makes this Nokia 9 different though is the amount of adhesive holding it all together. Yeah, most glass backed phones are glued shut, especially when the phone has an ip67 water resistant rating like this one. But this adhesive is excessive. I can use my razor blade to slice between the glass and the metal frame and cut through some of the adhesive.
But since there are never any repair guides from the manufacturer, I'm going into this phone blind and just hoping that I don't cut anything important. With all the adhesive, this is definitely one of the hardest phones to get inside that I've taken apart so far this year. Finally, I am able to peel up that back glass panel revealing a shockingly vibrant wireless charging cable with a pretty sweet golden FC foil wrapping around the camera lenses. This would make a pretty awesome looking clear phone. It would be pretty similar to that Pixel 3 that we made transparent last year.
I'll peel off the last little bit of black tape over the top of the wireless charging. Then let's see if this thing still turns on after all that prying. I'm always amazed at the amount of ingenuity and design that goes into making these phones. Speaking of extreme ingenuity, the book I've been listening to this month is about the Wright brothers. Huge thanks to Audible for sponsoring this video.
The Wright Brothers is quite possibly one of my favorite audio books of all time. It talks about how 2 guys were able to succeed in building the first ever flying machine using their own brains and their own money. What makes their invention even more impressive was that at the same time the Wright brothers were working, the government was dropping oodles of money into developing their own flying machine, which ended up failing miserably. The true story of the Wright brothers' hard work and ingenuity paid off big time and I definitely recommend listening to it. You can get your first audio book for free, even this book, when you try Audible for 30 days.
Check the link in the description or visit Audible. com/jerryrig. You can also text the word “jerryrig” to 500-500. The trial also comes with 2 free Audible Originals. These are exclusive audio titles found only on Audible, created by storytellers from all kinds of genres.
Theater, journalism, literature, and a lot more. Audible. com/jerryrig or text “jerryrig” to 500-500. Even if you decide to cancel your free trial, you still get to keep your audio book It's a win-win. Let's see what's under this black and gold panel.
There are 8 screws holding the top half to the phone, then the whole thing can start to peel up. There is still adhesive on the right side... surprise. And the ribbon cable for the flash and depth sensing cameras over here as well. I can unplug that ribbon with my plastic pry tool.
And then look at all this adhesive. It's getting kind of ridiculous. Now that the back plastics are off, we get our first real glimpse inside at all the cameras still hidden underneath the motherboard. I'll unplug the long gold battery power ribbon and then make my way around to each of the 5 internal cameras, each one unsnapping like a little Lego. And yes, this is indeed the funnest thing I've done all day.
Up here is some metallic tape connecting the front camera to the vibration motor. It's a 20 megapixel little guy. It looks like the motherboard is one solid piece running all the way down to the bottom of the phone, so I'll unscrew the 5 bottom plastic screws and pop off the loudspeaker covering that bottom portion of the motherboard. There are 3 white circular water damage indicators on top of the motherboard And then an additional 5 screws holding the motherboard into place inside the frame. And then, of course, we can remove the SIM card tray.
This can also be step number one if you're into that kind of thing. But I usually like to spice things up and figure out it's still there later on. Finally the motherboard can shimmy out of the frame revealing some pretty cool stuff. The whole frame is made from milled aluminum with a cutout for the copper heat pipe, and a deeper indention for the camera module that was milled after the frame went through its anodizing process since it's a different color instead of blue. The tiny earpiece is up here in the corner, along with the circular vibrator motor.
Taking a look at the backs side of the motherboard, we get a dollop of thermal paste sitting over the processor and these 5 cameras. Since all these cameras do the exact same thing at the exact same time, it's super important that they are all sitting in the exact same housing. If any one of the cameras was out of position, it might mess up the image that the phone is trying to stitch together. Each camera is housed in the same solid block of metal. None of the cameras have OIS either, because if they were all independently optically image stabilizing at the same time, and individually moving themselves to compensate for shakiness, it would be even more difficult to stitch together the image that they are all taking simultaneously.
The cameras are also labeled. You can see the bottom and center cameras are RGB or color cameras. And the outer cameras are all mono or black and white detail cameras. It's a pretty cool set up. I'm a fan of new innovations, even if they don't always go mainstream.
It's still fun to see how they work from the inside. Unfortunately for us though, Nokia is still not giving up on the super strength adhesive that's holding this whole phone together. Including underneath the battery. My thin metal pry tool is no match for the battery adhesive. I can grab my plastic tool for more leverage, but even then, the battery is bending at unsafe levels.
Batteries are made up of positive and negative layers all wrapped around each other. And if those layers bend or crush into each other, the battery can short out, spark, and start a fire. So it's super annoying when companies put permanent adhesive underneath the batteries. And for that reason alone, I highly recommend that you do not buy this phone. Future battery replacements would be near impossible and recycling the phone after it's life is over is even harder.
Instead, just buy a phone that can be repaired and recycled easier than this one. Along with the unnecessary amount of adhesive, Nokia also put the display flex ribbon right under the battery in prime prying location. My efforts to remove the battery ripped the ribbon cable for the screen, most likely killing the display. The battery also sits on top of an old school first generation under screen fingerprint scanner, which is probably why it struggled so hard to function. It doesn't work near as well as the later under screen fingerprint scanners with lenses and better sensors like inside the OnePlus phones.
I'll put the 3320 milliamp hour battery back in its slot over the copper heat pipe. And now it's time to see if I accidentally killed this thing by removing the battery. I'll try smashing the quintuplet cameras back into each of their own little square holes in the motherboard It's kind of hard to line them all up with their squirrely ribbon cables. Honestly, this phone does look really cool inside, but it's definitely not one of my favorite phones to take apart. I mean, except for snapping in all 5 camera ribbons like little Legos.
I'll do that part again any day. I'll get the front camera back into place, and then the battery gets plugged in and the 5 screws holding down the motherboard. Then I can clip in the back panel ribbon cable and get the plastics all situated with their screws. And unfortunately, just like I feared, the aggressive battery removal toward the display ribbon that was hidden underneath the battery, I only get vibration and sound, but no image. Usually we are successful with these reassemblies even though we go in without knowing what to expect.
So I guess could we say that the Nokia 9 fails the teardown? Until companies stop putting permanent adhesive under their batteries, I'm going to suggest not buying this phone. Simple pull tabs or gentle adhesive is more than enough, and it's not like the batteries are going to go try to escape all on their own. Either way, don't forget to grab your free audio book with a 30 day trial of Audible. Link in the description. Hit that subscribe button if you haven't already.
And come hang out with me on Instagram and Twitter. Thanks a ton for watching. I'll see you around.
Source : JerryRigEverything
Phones In This Article

Related Articles


Comments are disabled
Latest Articles


