iPhone XR Easy Glass Replacement without disassembling By How-FixIT
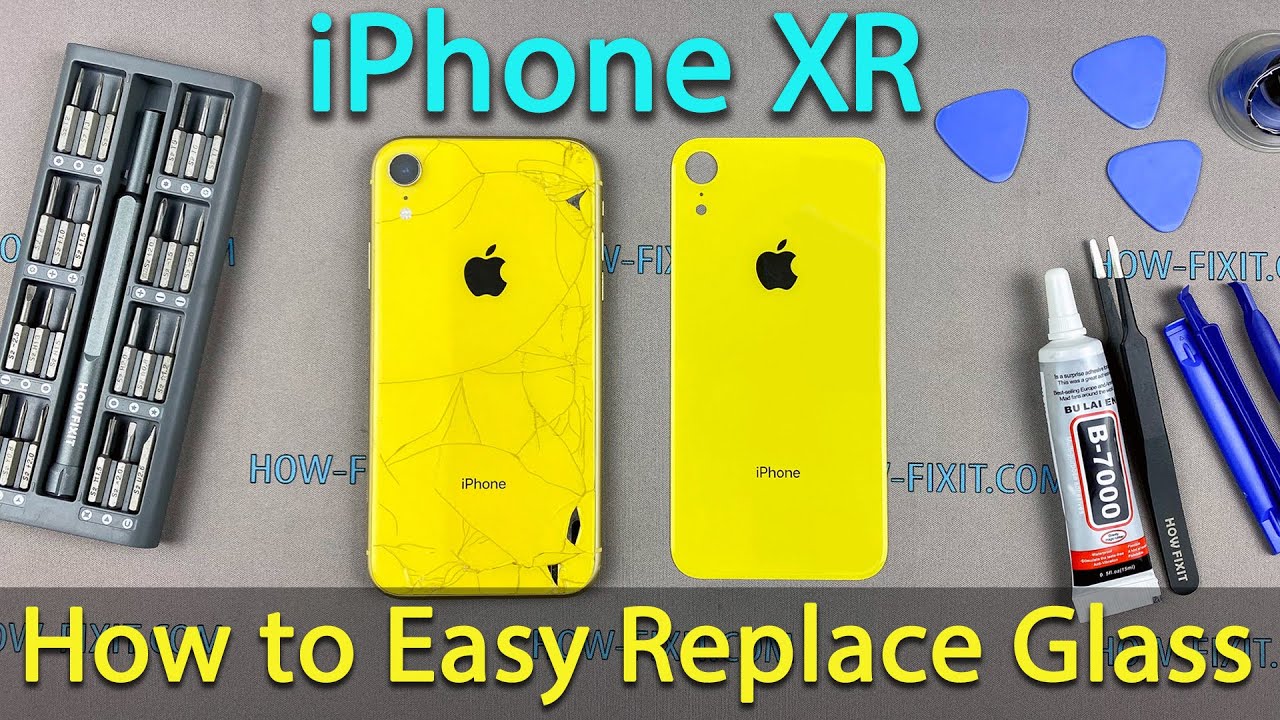
Hello everyone, welcome to HowFixit In this video, I will show you how to replace the back glass on the iPhone XR without disassembling the smartphone. As you can see, only the glass was broken, but the camera glass remained intact. In this case, you can replace the glass on the back housing without disassembling the iPhone XR If the glass on the iphone xr back housing is broken and the camera glass is broken too, in the description under the video I left a link to another video instruction, where I show how to replace both glasses. And so, the purpose of this video is to show you how to replace the glass on the iPhone XR without disassembling and NOT using special equipment like laser machines and similar professional tools. What tools you will need for repair: 1) The first it's the new glass. This is not just a standard glass, but a special one, I will explain why a little later.2) Glue B-7000 3) Tweezers. Please note that tweezers with flat ends.4) Safety glasses. This will keep your eyes from being hit by glass shards.5) And the last is the clamps. You will need these clamps in the final step of gluing the glass to the iPhone back housing.
For all these tools and spare parts, I left a link in the description under the video. Now I tell you about the difficulties of this repair. When peeling off the glass on the iPhone XR back housing, you need to be extra careful with some parts of the rear case. There is a wireless charging coil in the middle of the case, and it is better to remove it in the last step. Then, there is a flash under the camera.
In this place, you also need to be extremely careful. And there are also certain difficulties in the lower part of the iPhone case, but I will show them during the repair process. If the glass is broken, like in my case, and you can to pick up the glass, then you can start repairing. If the glass is cracked, but not a single part of the glass has fallen out, then you will have to break the glass yourself. If you have to break the glass, it is better to do it in the lower part of the case, a little later I will show you exactly where.
Now about replaceable glass. As you can see, the new replacement glass can easily be placed on top of the broken glass and even the glass of the camera lens does not interfere with this. This is because the hole for the camera glass is slightly larger than that of the original glass If you didn't know, the original glass is located under the rim of the camera lens, and in order to install the glass with the original hole size, you have to disassemble the iPhone and break out the camera mount place. This is really necessary if the camera glass is broken too. In the description under the video, I left a link where to buy such a glass with a large hole for the camera.
OK, let's begin. Find a comfortable place for the repair. I use a silicone soldering mat, it works great in this case. Be sure to turn off your iPhone XR before starting repairs. Next, use the glasses and, preferably, put on gloves.
Small particles of glass are very dangerous for the eyes and gloves are needed to comfortably work with a heated phone. I recommend you find a heat gun that works up to 320 degrees Celsius because this temperature of hot air will be enough to remove the glass. If you do not have such a heat gun, then you can try to use a regular hairdryer with the hottest setting on. I want to prevent you right away that it will be quite difficult to remove the broken glass with an ordinary hair dryer, but it is possible. In the video instructions for replacing broken glass with full disassembly, I used a regular hair dryer, as an example that this is possible.
In the process of removing glass, I will show the main steps of repair, which can be difficult. Pay attention to this edge - it's made of plastic. It can be damaged very easily, so be careful when removing the glass. On the bottom of the case, be careful with these cables, which you can damage with tweezers while removing the glass, as well as with these metal parts of the case. It may seem that you are pulling on the glass, but in reality you are pulling on a part of the case.
By the way, in this lower part of the case it is easiest to break the glass, because there are places that are not glued to the metal parts. The wireless charging coil is located in this place. I will remove this part of the glass at the last step. This part of the glass is the most difficult to remove, because here is the glass next to the bezel and the ledge of the camera, it will have to be broken, and there is also the camera flash. Pay attention to this little grill, carefully remove it and put it on the new replacement glass in the same place.
Place something on the flash diode to prevent melting when the surface is heated. Now you can remove the rest of the glass above the wireless charging coil. As you can see, I pushed through the tweezers while removing the glass and now there is a scratch. Fortunately, the protective layer of the wireless charging coil is strong enough and I did NOT damage it. Therefore, be careful and try to avoid such mistakes.
Now let's start removing the old glue from the surface. Use isopropyl alcohol to remove any rest glue. As a result, you should have such a cleaned surface. Next step is gluing the glass to the iPhone XR back housing. Take glue and apply it to the surface of the back housing, the main thing is NOT to fill the camera flash diode with glue, wireless charging coil and the bottom of the case where no metal frame.
Fix the iPhone case with clamps and leave the glue to harden for at least 30 minutes. As indicated on the tube of glue, it takes 24 to 48 hours for the B-7000 glue to completely harden. But, from my own experience, after 30 minutes you can use the iPhone XR, the main thing is not to expose the smartphone to high heat. Good. While the glue hardens, you can drink, for example, coffee.
Now you can remove the residue glue on the back housing. So, the glass fit well and almost no changes are visible near the camera lens. In any case, this is the best what you can do in the shortest possible time and for a low price OK guys, on this step repair is complete. You were on HowFixit and see you next time.
Source : How-FixIT
Phones In This Article

Related Articles


Comments are disabled
Latest Articles


