iPhone 12 and iPhone 12 Pro Screen Replacement (?unrepairable?) By ersbit
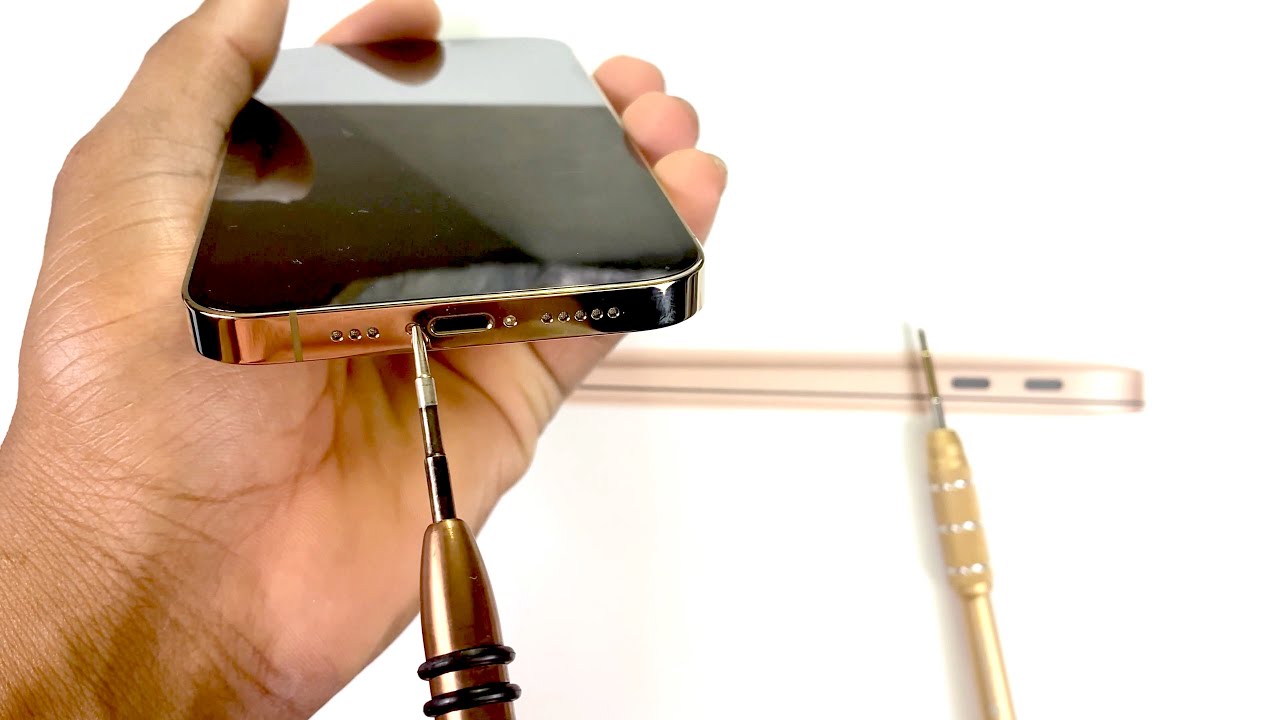
Hey guys welcome to ORBIT in this video I'm going to show you how to take off the screen on the new iPhone 12 Pro in order to change it. If your screen is broken, let's start by removing the two screws at the bottom of the phone apple added, a new ceramic shield on their new Apple iPhone 12 Pro this year, while removing the screen on the new iPhones. I found that it's really difficult compared to the other iPhones. The next step is to turn off the device after that grab your suction cup, and just put it like. I did. The suction cup will help you lift the screen in order to hit it evenly through the frame.
Also, I'm using a heat gun, because that's a really common tool that you can get and if you do not have it a heat gun, you can use a hair dryer, but it's going to take more time than a heat gun. As you can see, I started with the green guitar pick, and it broke, so I was in need to re-hit the device because the glue apple has inside is really strong. So you will need a lot of round of heating up the display in order to have your first gap using a hot plate is really efficient, but if you do not know the exact time that you need the phone to be heated up and the temperature that you need to put on the display of the hot plate, you might burn your LCD. Using a heat gun is a little safer because you can direct the heat on the edge of the phone where you have the frames, because the glue sits on the frames. If you have the frame heated up in a good temperature, you will get your first crack, and you can start to lift the display.
Also, I'd advise you to put some gloves, because the phone is quite hit up, try to work slowly and heat up the display and try to have your first gap between the phone and the frame. It might take you some time but be patient in order to not break the LCD. Also, like I said in my other videos, try to not use a metal tool because you will scratch the edge of the phones, try to stick with plastic tools. So here I have my first gap. The tool was able to enter between the frame and the screen after you have your first gap.
Try to heat up the display more and work your way around in order to widen that gap. Also, if you find any kind of resistance, while lifting the display add more heat, and it will help you take out the screen safely once the gap is wide enough. Try to put the tools in like I did and move your way around. The other part of the phone where the screen is still glued to the frame and always use a little of heat and progress on lifting the display just go slowly, and you won't break anything. So at this point I have 80 percent or ninety percent of the display is open.
So you just need a little of heat again in the top of the phone in order to heat up that glue. That will let you lift the screen entirely work. Your way around slowly do not rush it because you can break the flex, cable or even crack the display. I'm not sure why it's been hard to lift the screen on this iPhone 12 Pro it might be due to the new ceramic shield. The ceramic shield look like it.
It has some good heat sink properties and using the heat gun was a little difficult because you need to heat up a spot at a time in order to progress, as you can see, the way to go with a heat gun is slow and progress. Yes, we have it open right now, it's time to test the display and see if we've not broke anything so turn on the device and check your screen. The screen is not broken and everything is still working perfectly. So this looks a little familiar. It hasn't changed much on the internals from the iPhone 10.
So let me show you what we have here. This is the motherboard, then the screen and the haptic feedback and charging module in the bottom. We have the batteries the sim card tray. Then we have the camera modules on the upper right. Then we have the speaker, the front speaker, cable at the upper portion.
Then, if you break the speaker flex cable, your face ID is gone. There is no way to recover the face ID because in order to recover the face ID, you will need to solder some micro components so do not break the face ID cable, which is attached to your speaker from speaker module at this point. While doing a screen replacement. You need to be careful about the front speaker, flex, cable, that's the most important part that you do not want to break. So if you need to change your display on a new iPhone 12 Pro, you need to remove the screws on the cover of the motherboard.
Remove all the screws then remove the two flex cable that are attached to your display. Then you need to also remove all the four screws at the upper portion that holds the speaker module on the motherboard. If you've removed all that, then you need to transfer the speaker module in onto the new screen. Then reattach everything the way you removed it, that's basically it these two cables are connected to the camera module of your iPhone. If you break these cables, your face ID is gone.
It goes for the same for the speaker. Cables. If you break that also your face ID is gone. So it's time to close the device every year apple adds something that makes the repair on the new iPhones difficult in this year. The camera modules are tied onto the motherboard and also the screen are somewhat tight to the motherboard.
So if you break your screen or camera, it's really difficult to have it repaired and functional as normal. So before you close the screen onto the frame, you need to add some glue around the edge where you have the old glue, and I'm using b7000 for the glue that I use regularly to seal the phones after replacing the screens. The one that I'm using right now is also b7000. Using this method, try not to put too much glue on the phone when the aftermarket screens are out, they will surely come with some glue. That's cut to match the frame of the phone, so you will not need to use b7000 to repair your screens because it's going to come with a pre-installed glue on the screen when you think you've added enough glue.
It's time to close the device you press gently on the corners, you will hear a little popping sound. It means that the screen is entering the frame, then time to put the screws back in then. The last part is not mandatory. You can use any kind of stuff that can apply a little of pressure, not too much because you risk damaging the screen just a little of pressure on the edge of the screen against the frame of the phone, and that way the glue will stick firmly to the phone and the frame you do not need to use too much pressure, just a little of pressure to make the glue stick better again. After all that, you need to test the phone in order to be assured that you did not break anything.
So that's everything the lighting, the brightness, the true tone display and all that that is everything that makes the OEM screens one of a kind. Thank you guys for watching subscribe like and share I'll see you on my next video.
Source : ersbit
Phones In This Article

Related Articles


Comments are disabled
Latest Articles


