iPad Air Charging Port Replacement By Go Cell Phone Repair
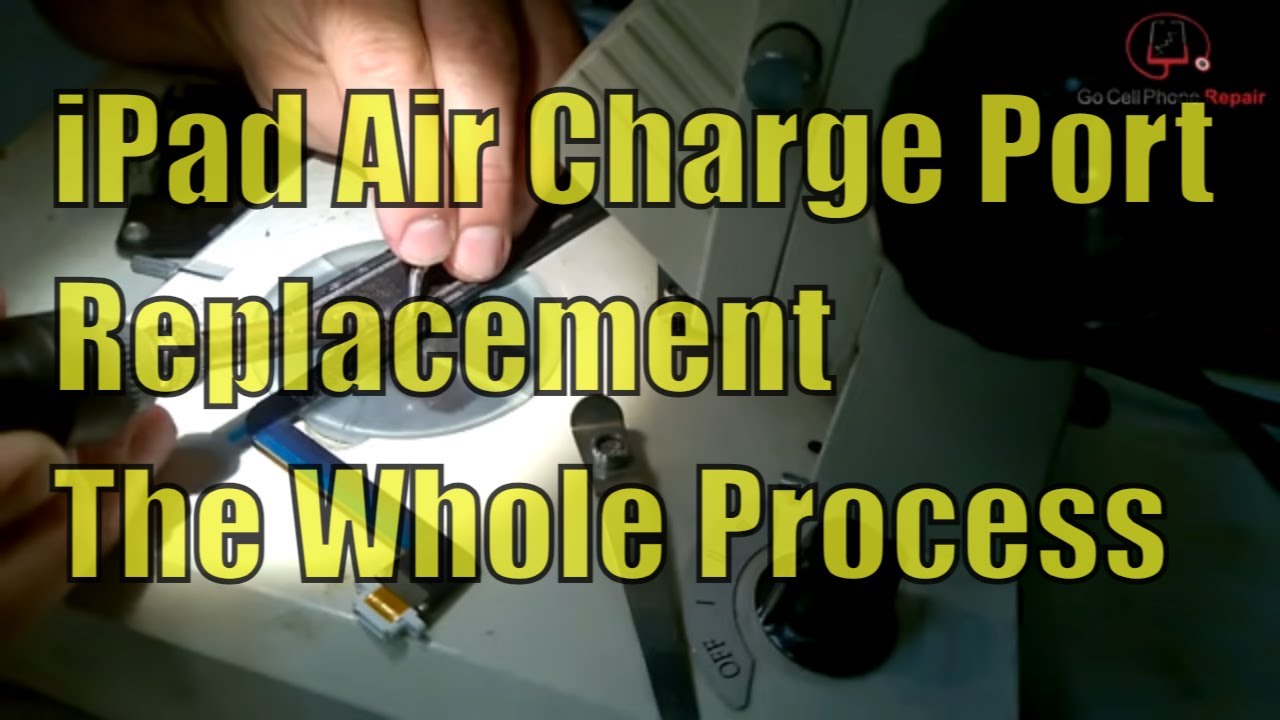
The information contained in this video is intended for educational purposes. We are not responsible for any damage to your device, resulting from improper, disassembly or installation proceed at your own risk. Today, I'm going to show you how to replace the charging port on an iPad Air. This is an advanced level repair and I do not recommend it for most people. In fact, if you have any other alternative, you probably will not want to go through this procedure. You'll see why shortly, but it does require micro soldering, it's pretty messy in there, especially if you're working with the 3G model, which is what we have here.
The story behind this one is that apparently, the lightning cable was plugged into the device, and it dropped and, of course, landed on the cable itself. So that's why you can see it's pretty torn up there at the port. The customer took the device to Apple and our understanding is they wanted nothing to do with it, and again you're going to see why here shortly very understandable, here's the charging port that we're going to replace- and the first challenge, of course, is going to be getting the glass off of the front without breaking it. Now, when we pry these things apart, I will say that the iPad Air's are a little easier to open up you're, definitely going to want to use some heat and be very patient. Take your time, it's a very small amount of stress that can be tolerated by these lenses.
So the main thing is you want it to come off all in one piece, and you'll see here: I started with a dull razor blade. I season Oh doesn't quite fit into this gap, so you need something really thin to just get underneath the edge a little and be very careful. It's also easy to scratch. The paint, because that white stripe that goes around the outside is a painted surface from the inside. So as soon as you get it to lift, you want to get rid of the razor blade and move to something a little softer I'm using a playing card here to get started, and then I eventually switch over to a light gauge nylon pick.
This is 0.3. Excuse me 0.7, three millimeters, and again you just have to really take your time, use lots of heat and be patient. We don't want to bend the glass. We want to kind of keep the glass straight and bring it all off as at one time as much as possible. So it has a certain amount of flexibility, but not much, and you'll see that I just keep alternating between heating and prying.
This is going to be kind of a long, video, so I'm going to put some shortcuts in here. If you want to skip past anything, you can just click the button and that will bring you further down into the video. So the first part here is going to take a little while, but you'll see just a lot of patience, persistence and heat, and eventually we will get around this thing without breaking it. What you're? Looking at there, the little white piece? Those are the piece, the pieces of plastic that come with the lens protector installation kits, and they work out pretty well because they're about the same thickness as the guitar picks, maybe even a little less. So you can get under there without placing any stress on the or without placing a lot of stress on the glass that is now as usual.
We want to be very careful down here around the home button, nice thing about the iPad Air, it's a little safer than working on something like an iPad 2 or an iPad 3 as far as not having so many cables on the inside that are easy to cut through a definite design improvement from Apple. When you go down the right-hand side here, you want to stop about two-thirds of the way down, because we do have the Flex cables for the lens, digitizer and LCD right about here. So be really careful and don't go too far. That's going to be the last thing that we get to and by the time we pry out the rest of the perimeter here of the device and start opening it up. We'll just use some heat to release that last little part that we're not going to actually pry underneath again, a very shallow prior.
You can see I'm not going very deep inside and at this point the lens is kind of opening up here. Now, if you release it, it will stick to itself again but I, don't like putting anything inside her as a placeholder so much anymore, because it's easy for things to fall down inside and the other thing is I'm not using gloves in this video. But I would recommend that you use some rubber gloves when you get to the inside, because if you get your fingerprints on the LCD, it's just really annoying to try to clean it off and no matter what you do. It seems like you can't get it perfect, so really try to avoid touching the inside of the glass and the LCD as much as possible and cover them with something that will prevent dust from falling on them, while you're working on the rest of the inside. So at this point you can see most of the adhesive is going to be on the right hand, side in the bottom, so I'm just kind of gently lifting on the glass not putting a lot of pressure, but slowly heating.
It and you'll see that it just kind of starts to give on its own. After a while. So let's move down here a little further, you can see I'm being very careful. We have a cable on the right-hand side of the home button. That runs all the way to the edge of the tablet.
So you want to make sure you don't cut through that as well. Some people like to use a suction cup I find that a little awkward if you're working by yourself now, if you've got someone to give you a hand and there's a pretty good example of the flexibility you can see. I've got the lens bending a little, and it's not cracking but again, there's only so much stress that it will withstand. If you have someone working with you, this is a little easier. You can use a suction cup kind of have them hold the case while you're prying on it.
But in my experience this is the easiest and safest way I've found to remove the glass. You can see the last bit a little of heat. There release the right hand, side, and then we'll just prop this up, so we can get on the inside now. The interesting thing is we'll: have the standard four screws in the corners of the LCD one, two, three four, the ones at the top are going to be covered by a black adhesive, so you're going to have to kind of peel the sticker back in order to expose the screw head. I'd recommend you leave that adhesive there we can always go back later and cover it with something else.
Like some Tapton tape, my assumption is the reason they cover. These screws were to prevent interference with the digitizer. We do have touch screens that go kind of funny every once in a while, and the biggest culprit seems to be not putting tape down in the right places. So there are things on the inside of the iPad Air that can interfere with the touch screen itself right around the edges. So you want to make sure you put this back as close to the original as possible once the screws are out, you'll see that the LCD actually comes up towards us and that will explode exposed the retaining plate for all the cables.
We've got three screws here that we're going to go ahead and take out, and then you'll very carefully pry behind that metal panel and the LCD cable is actually going to be stuck to the back of it. So that'll all come off at one time pretty much, and once we pop that out, you'll also expose to other cables that we're going to disconnect here in just a second and remember, you have your home button connected at the bottom as well, so be sure to take your time, disconnect these two flex cables. Then all the way down here at the bottom we've got a flat, flexible, cable, connector, with a piece of tape covering it. So what you want to do is go in here with a little of heat, grab your tweezers and carefully peel that tape off you don't want to peel it the wrong direction and put any stress on the connector itself. Once you do that you can pry the connector open from the top straight down, so we'll actually lift it up towards you, but be really careful with that.
If you pry those in the wrong direction, it can be bad news. You see a little of residual adhesive there on the glass, but once we move that away slowly and unplug the home button, we can set both of the lens and excuse me digitizer and LCD aside now, we've got all kinds of fun stuff on the inside. Here we've got a bunch of tape at the bottom, as well as some tape up at the top, where this metal shielding is so there's just screws everywhere. Cables, antenna, wires tape, there's just tons of stuff in here you have to deal with I've got my nylon tweezers here. I prefer to use these whenever possible, they're fairly precise, and they don't risk poking a hole in anything.
The way that the ESD tweezers do, but whatever you can get in here with safely of course, is going to be the right tool for the job. You'll see that I'm just going to remove some tape here from the SIM card reader flex, cable, which also plugs into the logic board down at the bottom and I just like to set this kind of in proximity to where they were removed from so when we do reassembly. We'll know where they go from here: you're going to want to go ahead and unplug the SIM card flex. Cable, excuse me sim card reader, flex, cable, and then we've got a couple of antenna wires down here at the bottom. Some more tape for cables, like I, said just all kinds of crazy stuff on the inside, so make sure you go through and disconnect everything from the logic board that you can see at this point.
Most of it is exposed, but up at the very top of the battery there's a metal cover that goes all the way across, and it's hiding a bunch of other stuff that we've got to disconnect before we can remove the logic board. Well, we will also have to take the screws out at the charging port and kind of push that through the rear housing, so it becomes accessible now, because this is broken charging port. We're not going to worry about damaging that too much, but again as a safe practice. It's always a good idea to try to get these things out without causing any additional damage. I found it a lot easier to get to these screws by turning this over, and they're kind of at an angle which is interesting.
They don't go straight in there at about a 45-degree angle. So when you take these out, make sure that you have your driver seated properly, and then we've got one screw. That goes through the main board right about there up at the top we're going to take out every screw. That holds this metal panel in place, and then we've got two small ones up on this end, it's kind of unusual, and I ended up taking out a few more things that I didn't need to from the 3G module at the top. So I've skipped a few places here, you'll see later that there are some screws missing.
You don't have to take those out, but anything that you find that makes your job easier. You'll probably want to go ahead and remove. The main thing is this panel, and it's got this funny tape on it. That's bonded to the panel itself and the piece above it now I would recommend you try to keep the tape on the panel. I did pretty much the opposite underneath here.
By the way we've got antenna wires, pop connectors, all kinds of neat stuff that I'm actually disconnecting. Now you can do that later. If you find it easier, just go ahead and take that middle panel off first. The tape on this panel is just ridiculous, so again try to keep it on the panel itself and peel it away from the tablet. I did exactly the opposite, and it just started rolling up on itself and became a real mess when I went to put it back together, you can see I started to take the 3G antenna out here and that's not necessary at all.
You don't have to worry about the camera, but again, I was just kind of poking around in here trying to figure out exactly what we need to move to release it, and the main thing is, you might even be able to just flip this panel up and access everything you need to get to it. May not even need to be removed completely, but it makes it a little easier, especially working around these sensitive cables. So I applied some heat here, and you'll see here in just a second that what happened is I kind of went backwards, killed the panel away from the sticker, and that wasn't a great idea, but it got the job done and, of course, if that panel gets bent a little, you can always straighten it out. So don't worry about that too much, and you want to be real careful with this tape. It is stuck to the backs of the back of these flex cables, and then you've got one cable, that's stuck to the other one underneath it.
So it's just lots of fun to work up here on the top of this iPad. Alright, so we've got that mess out of the way, and the next thing I did is I started to disconnect everything here at the top you're going to have more pop connectors and antenna wire there on the right-hand side, you can see that's where the 3G module actually interfaces with the logic board. There is one screw here that you will want to take out. It's going to make it a lot easier to well. Basically, you'll probably need to do it in order to unplug the pop connector, and it's going to make it a lot easier to maneuver that antenna wire back into the right position, so I would definitely take that one out start disconnecting all these things at the top.
If you want you can get the camera it's over there. On the right hand, side actually came back to that. A little later. Lift these up make sure we have clearance, and again I stuck this piece out. You don't need to take it completely out of the frame, but if you want to see what it looks like there, it is that will come out completely independent.
The main thing is, at this point: I want to go between these two cables. This is going to make it a little easier to kind of peel one of them back and expose. What's underneath there is a screw in the center there. That has to be loosened if I remember correctly removed from the board we'll see here in just a second you. So if you lift this cable that the cameras attached to it's going to expose another screw down inside and another connector or two that we need to detach all right, so we've got our camera over.
Here, definitely want to unplug that, and you can see, the board is somewhat free, there's a little of adhesive under it. At this point and I was just kind of feeling around. We will have to disconnect this one over here. There's a piece of tape over the top of it- and this is probably one of the more challenging parts of this repair- is to put that thing back in when you do the reassembly. It's just really tricky to maneuver that cable back into position.
The bottom kind of start, taking this tape off be very careful around here. What tends to happen is this tape is going over some other flexible cables and antenna wires, and you just want to take your time and be really careful and make sure when you peel it back. You're not tearing through anything and in fact, we've got two separate pieces of tape, one around each antenna wire and those go over the charging port flex cable, so it just gets a little messy inside here, be sure to keep track of where all the stuff goes for. When you put it back together or of course, you can always go back and look at this part of the video I'm going to bend those over to the side, so they're kind of out of the way, and then you've actually got to separate these two antenna wires because one goes to the right-hand corner and the other one goes the opposite direction. So again, I try to preserve this tape as much as I, possibly can, so we can use it when we put everything back together, you see I grabbed that and just kind of pull and again with a little of heat.
This becomes a lot easier. We can just kind of peel those away from the back, and again you see it actually unplugged here in a moment, you'll see it unplug one of the cables that we're going to have to work with. So I can't stress enough. You want to be really careful when you're working down here. You see that we've got two FF C's right down here, and they open from the inside out, but this tape grabbed a hold of one and literally just slid it out of the connector.
So I didn't do any damage, but I can see how it might easily be a problem, so be really careful in here. This, of course, should have been released before it unplugged, but that doesn't always happen now. I'm going to push from the bottom to get the lightning connector out of the housing, I've already removed the two screws. But this thing is seating: it in here pretty well, so you're going to have to kind of push it back and just lift it out and again watch out for all the cables that are in the vicinity, and we'll just kind of slowly peel that off the rear housing. However, it is attached underneath the logic board here, so this is as far as we're going to go at this point, and the next thing we want to do is go ahead and pull the board, so I would recommend you be very careful here.
These PCBs have a certain amount of flexibility, but we don't want to put any more stress on them than necessary, so just kind of gradually work. Your way up, there's adhesive on the outer edges of the logic board, so that's kind of what you're working against and again be sure that everything is unplugged before you pull anything out. It's always best to take your time and be careful so that this thing right here is just really awkward to get even to get unplugged getting it plugged back in is going to be even trickier. So as long as you've got the connector released, you should be able to lift the board out and kind of slide it out of position. But if you want to be safe, it's going to be best to unplug that first, because with that'll be about one more thing that we'd have to replace if we damage it so from here, we can go underneath and again, just pry, very gently, and you'll see that the board starts to lift out away from the housing and, of course, if you run into any resistance, make sure you have not neglected to unplug something and from here we can just gently lift it out, and there you have it now on the back here, you'll see where the charging port interfaces, with the logic board I'm going to peel this tape back.
So you can see. There are quite a few soldering points here, so you're definitely going to want a microscope and be very experienced with micro soldering. This is not a real fun repair like I said, but we felt it was worth doing. So that's what those are. What the contacts look like next thing we need to do is get this under the microscope and remove the old charge, poor flex, cable, so we'll use the heat pencil to lift.
This off of the board will be pretty safe on the backside, because all the components are going to be on the front of the logic board. So you just want to concentrate the heat right in this area, and this is actually the easy part. Next thing we're going to do is clean up the surface, so we'll take solder, braids and the iron and get all the as much of the old stuff as we can off of the surface, and then we'll apply some flux here, keep everything nice and clean and then another fun part here is going to be lining this up, because this has got to be perfect if any of these contacts are out of alignment at all. This is going to be one big waste of time once you've got it lined up you're going here with your iron and just tack it into position the sooner we can get this thing stuck to the board. The sooner we can stop worrying about it shifting around, and this did take a couple of tries, so I've edited out- probably a good 20 minutes or so of getting this thing into the right position and getting it to stick so once we've got it in the right position, hold it down we're going to go and add a little of solder to each of the connections.
Speed things up here, a little, it's kind of a tedious process. So here's a slightly better look at the board zoom in a little here, so you can get a good view of what this looks like after we've got everything attached and now the fun part we get to put this thing back together. So the assembly is roughly the reverse of the disassembly I'm not going to narrate every step of the way. Let me just say be very careful that you do not pinch any cables that you get everything plugged in properly. You don't want to have to do this twice.
Unfortunately, we did the initial soldering job must have missed one or two soldering points or something wasn't secured properly. So after this was done, I had to pull the board out completely, get it resat. Turd put it back in so on the second try things went better, but the first time you'll see here what happened you, and you can see. I did kind of bury that cable. The first time so I had to lift the board, pull it back out, try to avoid doing that as much as possible and definitely make sure all your cables are exposed before you put any screws in getting these antenna wires plugged in can be a challenge.
I decided to go ahead and test this out before I put the metal shielding in at the top and connected that one flex. Cable, that's such a headache at the top right hand edge, so I'm going to go ahead and connect the digitizer and the LCD and make sure we have some signs of life before we put the whole thing back together when you put the LCD in that bottom right hand: leg where the screw goes in tends to get caught on the cable from the home button. So you want to make sure you maneuver around that one I usually set it up above there until I get everything plugged in, and you can kind of just very, very carefully, lift it up and make sure you go over the top of that cable. You now I went ahead and put the four corner screws in I. Don't think that we would need to do that in order to test the tablet but went ahead, and did it anyways again watch out for those little black plastic things you have to kind of peel those back try to save them.
If you can, otherwise, you can throw some Tapton tape or something else over the top later on. So we'll just kind of lay it down here, not sealing it up just yet plug in the lightning cable, and you can see, we've got the tablet saying that it needs to be charged, but it is not actually charging. So this is pretty much what happened it kept shutting on and off, and it looked like it wanted to charge, but it doesn't hit the power button. It says it needs to be charged, and again we have this metal piece. It is not on the inside yet, but I'm convinced that doesn't have anything to do with the problem.
Furthermore, it really shouldn't have anything to do with the charging at all, but for some reason we are not getting a charge, so unfortunately had to pull the board again and go over the soldering, and once we got done, got ready to put it back together, and you can see now how we install this little metal bar in case. You need the information we get to deal with this, my favorite part. So what I did is I kind of lifted this up from about the center of the cable, and then I went over and folded it down. You kind of want it to point in an as an arc, basically is what we're looking for, and that will allow you to get the end to tuck into the connector. So it's a little awkward take some patience, and it can be very frustrating, but eventually, if you're very careful, you should be able to get it to slide into the connector and once you do that, you can kind of just push it the rest of the way in lock it down and hope you never have to do this job again.
Okay, so we only had to do this twice. I know it kind of looks like three times, but this was after the second resolver, and we got everything working charged it up, and it is communicating with iTunes as well, so everything's good and that's how you replace the charging port on an iPad Air. If you found the video helpful hit the like button and feel free to share it on the social network platform of your choice check out some of my recent repair and product review, videos and visit us on the web at go cell phone repair. Calm thanks for watching you.
Source : Go Cell Phone Repair
Phones In This Article


Related Articles


Comments are disabled
Latest Articles


