Huawei Nova 3i & 3 - In-depth Camera Guide and Review (with samples) 🇱🇰 By Andro Dollar
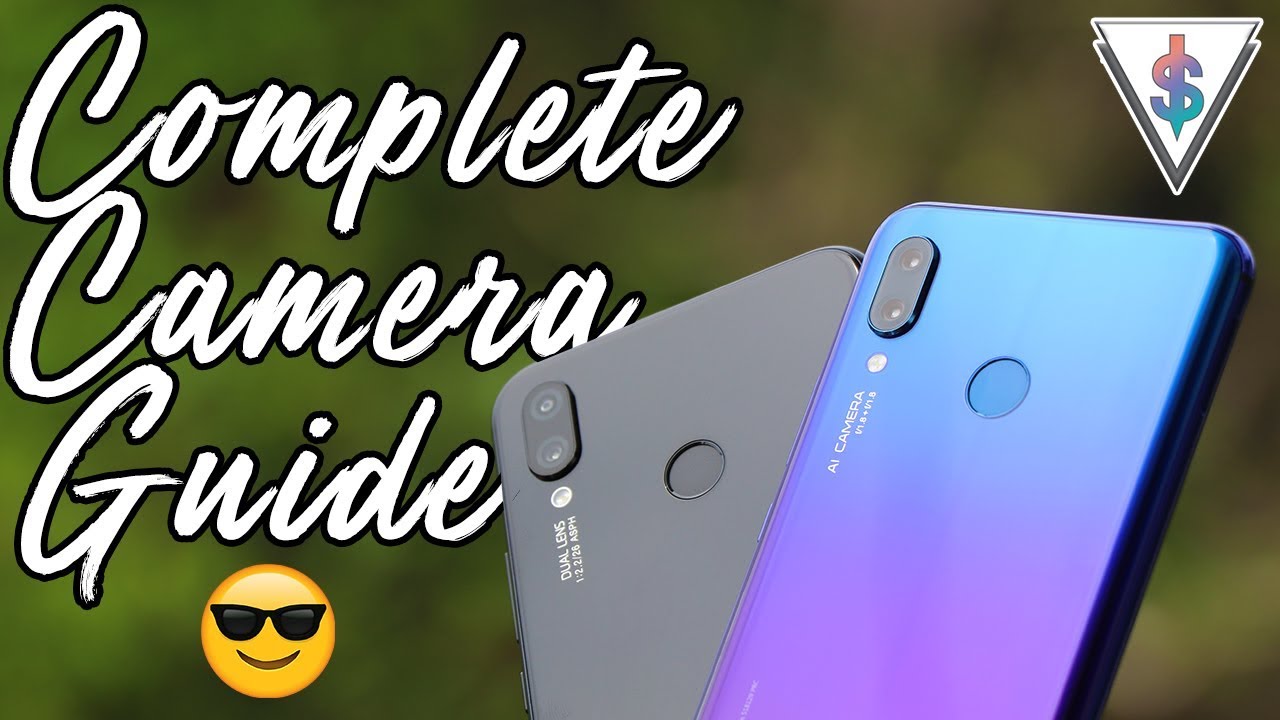
What I'm, holding in my hand, right now, is the walkway no watery eye, and this right here is the Huawei, no r3 and in this video, based on a lot of requests today, I'm going to be giving you guys a detailed camera guide for using the camera of this Huawei nor watchful eye, so without wasting any more time. Let's get right into this and go ahead and explore the cameras of the Nova 3i. If you're not subscribed to my channel, definitely go ahead and smash that subscribe button right now and let's get started with today's video first off. Let me show you guys how you can access the camera. It's pretty easy! There's a camera icon on the home screen or there is a camera icon in the app drawer as well. If not, if you want to quickly access the camera, you can do that from the lock screen itself.
All you have to do is just swipe up from the right-hand side and the camera will quickly open. So that's pretty awesome. Apart from that, there is also a setting on the camera settings called ultra snapshot. If you enable this, you can quickly open up the camera. When you double press the volume down button, when the screen is off, or else you can actually set it to take a quick snapshot.
So let me show you guys that right now, so the screen is off. If you just double tap the volume down button, it will quickly capture a picture or if you go ahead and set the auto snapshot to open camera. If you turn the screen off and press the volume down button twice, the camera will quickly open up. So that's pretty awesome now that you know how you can access the camera. Let me show you guys the main functions up top.
The first function is to scan a QR code, or you can scan any shopping item, so I think here the QR code. Functionality is what is most useful, so you can go ahead and use this function if you want and there's also trouble to turn on and off the flashlight from here, so you can make use of that. The second option is to turn on and off the flashlight. The first option is in auto mode. Second option is to turn it off.
The third option is to turn it on, and the fourth option is to always on the flash mode flashlight. So every single time when the camera is on the flashlight will be on. So this will be useful at night. I personally, leave it at auto. The third option is the moving picture mode, so these are live photos that you can quickly capture.
So if you do some animation like this, if you capture that picture now, you can see that this is a moving picture. So this is a moving picture. It captures the voice as well, and you can share it share that with anyone you want. So let me quickly put in the pin-code, and now you can just easily go ahead and share it across social media like to do whatever you want to do with it. The fourth option is: what's new with the guava tree light camera, that's the AI, so the AI camera part will enable different things with this device.
So for an example: if I just go ahead and scan on this plant, it will say plant over here or if I just go ahead and scan on my face. If I just show it my face, it will say room because I'm right now in a room, so it's detecting the environment, that I mean, and there are different things that the device is able to adapt to. So you can check all of that information in the initial video that I did. Huawei has around 18 to 20 themes in this device, so you can go ahead and play with that and see what works and what doesn't so what's awesome here. Is that say if you're using the plants' mode, it will have a specific set of sceneries the adjustment layers that are already pre-built using machine learning right here to see what's most important for this shot to make it look awesome and if you'll use machine learning to do that and automatically input all of those options into this picture and make it look awesome.
Sometimes it's good, sometimes it's bad, so you can play with it and see whether you like it or not. If you don't like it, you can always go ahead and disable it just like that. The fifth and final option is the setting struggle, and here you can change various settings, such as the resolution of capturing photos. The default right here is the 16 megapixel option, and then we have shooting in RAW, which is only available in Pro Mode. If you actually go inside the pro mode like this and now heading to the settings area now you will see that the RAW format option is enabled, so you can capture raw photos from your NOAA 3 I itself, and that's pretty awesome.
Apart from that, we also have the option of the GPS tag and adding the watermark. That's the watermark that you get when you capture photos like for any. If I shoot a picture like that, it will add this watermark of what we know. What we do a camera right here, so you can make use of that if you want. So, apart from all of that again heading back into the settings, we also have the assistive grid, so if you're using a grid, if you would like to use a grid to just short and balance it out, you can use this option to nicely capture that picture.
There are different options. You can go ahead and play with that, and also, if you are capturing selfies, you can turn on and off the reflection. You can change that setting as well. This is what a picture looks like with and without the mirror reflection feature on the nova, 3i, and also we also have the option to mute the camera. Now, if you mute it, it will not make any of those capturing sounds, but if I actually disable the mute now you can hear those sounds when you capture the picture.
So that's how you turn on and off the sounds when you're capturing pictures. Apart from that, you also have the time option in the time option you have all of these options that you can actually change. You can change it between two seconds, five seconds or 10 seconds now going into audio control. You can actually enable this, and what this will actually do is it will help you control your device with your voice, so you can say things like cheese to take a picture or take a photo where the voice reaches a certain level. So I will enable this option say cheese.
So when I say cheese see just like that, it took a picture. So if I say cheese see took another picture, so you can use the voice to control your device. If you don't want that, you can easily disable that as well. Also, we have touch to capture. So what this will do is now, when you just tap on the screen and focus on something for an example, if I just focus on this, it will go ahead and capture the picture.
The next option is to capture smiles and if someone is actually smiling in the picture, the phone really smart enough to automatically detect it and take a picture. So you can use this option when you're a group photo. Maybe this will actually be useful for that. Apart from that, you also have the option of volume button function, so that is the functionality of the volume buttons of when the camera is on, so you can either use it for zoom or you can use it to capture or focus so for an example, if you use it to now, when you come into the camera, if you just press this, it will just capture pictures just like that, so that's pretty convenient and that's what I like to personally have it on, and finally, we have the ultra snapshot mode, which I already showed you guys earlier and also, let's not forget, the restore default button. Now that we have spoken about all the main settings of the no r3i camera.
Now, let's talk about the camera modes that are available because there are a ton of modes that are available. The first option is the aperture mode, so with the aperture mode you can manually set the blur of the background and actually the aperture. So if you have a very good look at this picture, you can see that just this part of my hand is being focused right now, but if I change the aperture little by little now you can see that the whole hand, and even the background is now visible. So that's what the aperture mode will do if you want to particularly focus on something now for an example, if I'm taking a picture of this plot, I can just focus on this area and not need anything else, and this will actually help take a nice picture with a strong bouquet that you can actually use and that actually came out pretty well, and you can use this button. The wide aperture options to actually go ahead and change the focus level and change the blur later on, as well and add in a different filter and make it look even nicer, so pretty sweet options right here with the aperture mode.
So you should definitely go ahead and try this out on your device and see what artistic thing you can create with this. Next, we have the portrait mode, the portrait mode, that we all love, so you can just go ahead and place an object in front and just capture it using portrait mode and everything else around it. You can use this with both the front and the rear camera, so you can go ahead and play with it and see what or something you can make out of this. Next, we have the ordinary photo mode that this is the regular photo mode you want to use. If, when you're just capturing a picture, you can just tap anywhere to focus and easily take a picture, and it will automatically detect the scenes like I mentioned as well.
Next, we have the video mode- and here talking about video. These are the resolutions available on the Huawei know what V I, so you can shoot in 1080p at 60 frames per second or 1080p at 30 frames per second, you can even change the efficiency of this to h.265, so the file size will be smaller, and it will be more efficient, so you can use that and if you want 60fps, you can use that as well, and these are the settings that are available for video mode, so you can play with it and see now to capture video. It's pretty simple. All you have to do is just go ahead and press on this record button, and now it's recording a video. While the video is actually recording.
You can capture a picture, let's say you're recording something, but you also want to take a picture. You can quickly go ahead and press on this button and to quickly snap a picture as well. While it is recording, so that's pretty awesome, and always you can go ahead and pause the recording and resume it later on and finally, when you are done with the whole recording process, you can go ahead and press on this button and the video recording will stop and using this option up top, you can enable or disable the beautify option. So you can play with that, and you can turn on or off the flashlight from here as well. Next, we have the ER lens feature.
This is the new thing about the Nova 3i camera, in particular the Q Mode's and other awesome effects that they actually have. So these are the cue mode effects that are available on the Nova 3i, and these options are also available on the Nova 3 stuff. This is a cue mode from the Huawei Noah tree I part from the Q Mode's we have, or they also have some other effects and other backgrounds I already spoke about these in my 10 tips, video for the Nova 3i. If you want to learn about that, you can go ahead and check out that video I did have a card right here, as well as a link down below in the description. So definitely go ahead and check out that video to learn some awesome tips about the Nova 3i.
So talking about these effects, you can play with it and see what effect works for you, so you can have a bunny face like this, or you can have different backgrounds in your shot like this something fancy or something like this I think the setting that I'm in right now is not particularly the best. So it's not gonna work perfectly I, don't have proper lighting here. So these are these. These are the new options, and, apart from that, there are also 3d objects that you can actually go ahead and place. So this is a 3d object that has been placed on screen, so I can place.
The Arias object like this I can just use my hand now the object is there. I can nicely use this, so these are augmented. Reality objects that I can just nicely explore from the device. So you should have a really fun time playing with this, so definitely go into the settings head into this mode and check it out and see whether you actually enjoy using it. Now, apart from that, there are other modes that are available on the Nova 3i that are available under this more section, so definitely go into the most section to reveal all of these options.
Currently, these are the options that are available, the pro mode, slow motion, mode, night mode panorama mode like painting, HDR, time-lapse, filter, 3d panorama, bottom of document scan and artiste moon. Apart from that, there is also a download button right here, and there are other modes that you can actually install into this, like the good foot mode is not currently installed onto my device, but if I go ahead and edit now it has been installed and all of these modes have been installed onto my device. So you can go ahead and press on each of these options and have a look and make use of these on your device. So I will show you guys each of these options quickly right now. So this is the pro mode and with the pro mode you can actually change everything.
The shutter speed, the ISO, the white balance, everything you can change from here, and you can actually make it your own and be artistic about it. You can do something really great with this if you actually take the time and invest on it. So if you are a pro and if you want to make use of that, you can do that and by the way, if you want to exit out of any mode at any point, it's pretty easy. All you have to do is go ahead and press on this X button right here once you do that the mode will be removed, and you will go back to the ordinary photo mode that is available now going back to slow-motion mode. This is the slow-motion mode on the north 3i and the slow-motion lets you shoot at 16%.
Slow motion, that's 480 frames per second, so you can actually choose between automatic and manual mode right here, so you can actually shoot slow-motion. Video I will have a sample right here. So this is what a slow-motion looks like you can scan an object and let it capture, so you can actually set a specific area and that's what the device will actually be looking for when capturing of capturing something. So if I just move this box around that's the area, the camera will be looking at when actually capturing the slow-motion video. Next we have the night mode and with this, if you are in a really, really dim area- and if you use this night mode and capture, it will actually capture for a certain duration based on how much light is available at that time.
I once used this mode in a pitch locked place where I had absolutely no light at all, and it actually took 50 seconds to capture that night shot. It didn't turn out to be the best quality, but I'm actually surprised that the camera was able to pull off some picture in that dark. I mean this is a fifty thousand rupee phones for this to be able to pull off something like that. It's pretty awesome! So here's a sample of that. Next, we have the panorama mode that you all know and love.
You can use this to capture panorama. So if you want to just shoot a panorama like this I'll quickly shoot this, but you can capture some awesome panoramas with this device with that which I effect, here's a sample. Next we have the like painting mode and with the like painting mode, there are different options as well, such as the traffic trails light graffiti, as well as star trails and silky water. So you can go ahead and change the settings and play with it and see what works for you, here's a sample of the light painting mode. Next we have the HDR mode, and with this you can capture some sweet pictures with some HDR, and it will enhance your picture.
So you can go ahead and play with it. Here's a sample of HDR. Next we have the time-lapse mode, so you can use this mode to capture lengthier sequence in a short time period. All you have to do to capture a time-lapse is just go ahead and press on this button, and it will now start shooting. So you have to keep your phone still and record it.
This is not the best example show, so here's an example of a time-lapse that I actually shot earlier. Next, we have the filter mode on the Nova 3i. There are different filters that are available, so you with this button, you can change the filter, you can select none, or you can select any of these filters, such as a black and white mode. For an example. If you want, you can shoot that or if you want a halo loop, you can select that and just easily capture the picture without any effort, and you can even change the filter level from here.
So that's pretty awesome and convenient. If you don't want too much of the effort effect or if you want too much of the effect, you can actually change it to the maximum level and capture that picture. Next we have the 3d panorama mode, so this is like the Google sphere that we had some time back. So you can capture a big area with this. You have to actually hold the shutter button and capture, and now it has been captured in 3d mode, so I just have to hold on the camera button and just move it around, and now this has been just captured.
It's a very bad example, but you can take some awesome pictures just like that. I hope you get the idea of what I mean with 3d and Rama. Next we have the watermark option. So with this you can easily capture any feed any picture with different watermark. So you can add the location like this, or there are other options that are available like adding the time or date.
You can change the location, the weather. You can change the mood of the picture, so you can do any of this, and just like this, you can capture any awesome picture, so I'm just capturing this picture, so the watermark is getting added to the picture itself. Next, we have the document scan option and with this you can actually go ahead and scan any document, and it will act captured of human and let you view the document, and you can actually analyze now for an example. If I'm going to scan my business card right here, I can just scan it, and it will detect the box area of that, and it will scan the document and just show it next. We have the artist mode, so this is somewhat artistic.
If you want to create some artistic effects, you can use this. This is somewhat similar to prism. If you guys remember, there was an app called prism that got trending so yeah. This is trying to mimic something like that. So you can use this mode to capture some artistic pictures with the camera of the Nova 3i.
So if you just see this picture, I just took it without any effort, and it looks pretty sweet as well, so you can change the effect from here for the artistic mode. Finally, we have the good food mode and, with that, it's pretty good. If you're at a restaurant before taking actually having a meal, you can take an awesome-looking picture with the good food mode. If you bump up the saturation and make the picture look, awesome so definitely use this good food mode to capture the photos in food mode, so here's a sample of the good food mode. Finally, there is also an option up top right here, so you can see the information about each of these modes and read about it from that option and also there is an edit button right here.
You can change the order of these and just mess with it and see what works for you. Maybe you can put the most-used effects first, and you can change it up any way you want. Apart from these options, you can use this button right here to swap the camera and turn it into selfie mode and even when you're in selfie mode, you have a flasher always available right here. It will actually be making use of the display with the Nova to I. We had a manual flash right in front, but with the Nova 3i we don't have that, but in order to compensate for that, Huawei is actually using the screen.
It's turning white to turn the flash on. So with that option it will at theoretically put some light into your face when capturing a photo at night under the portrait mode. The front camera even has some lighting effects, such as the soft lighting, butterfly lighting, split lighting stage lighting, as well as the classic lighting. So these are similar to the lighting effects that you find on the iPhone as well. I, really like how the stage lighting and the classic lighting looks, but it's not perfect because around the face, if you sometimes look there are imperfections so hopefully, as time goes on where we can fix it, there's also a bouquet mode that you can take some bouquet pictures on the nova 3i and there is also a beauty level effects slider that you can adjust.
So this is what it looks like with Beauty level on 0, and this is what it looks like with Beauty level on level 10. Now, apart from all of that, when you go into the gallery, there are different options for you to edit the picture from here as well. You can crop rotate, add filters, you can adjust things man, the brightness contrast saturation, so you actually do won't need a third-party app to do all of this on this device. So it's pretty sweet that this ways adding it all of this onto this device so yeah, so you can also go ahead and favorite it and favorite it. And, apart from that, if you just press on this button, it will show all the pictures that you have captured on your nova 3i, hey guys, that's the camera guide for using the camera of the 103.
I most of these things will also apply for the Huawei know what three as well. Some of these settings are different actually and the Nova 3 actually has more settings in it, such as the monochrome mode under the mode options right here. So that's basically the black and white mode so other than those small differences. Both of these will actually perform have similar options built-in, but the camera performance on the nova 3 is slightly better than the camera performance on. You know what 3i, then, what is slightly expensive as well.
The Nova 3i in particular has four awesome cameras and even the Nova three has four awesome cameras. So definitely let me know what your favorite feature about the Nova, 3 and 3 is down below and if you capture something with you know what we just tagged me and I will definitely repeat my favorite picture. You can find me on social media. I am at Android order. All the links are given down below in the description and if you are not subscribed to my channel yet definitely to go ahead and subscribe to my channel right now for the full in depth.
Video review of the Huawei nova 3 eyes, as well as the Huawei watch P, you can request other videos from the Huawei Noah 3 and 3 I as well. Just drop a comment or drop me. A message on social media and I will somehow bring that, for you guys. Definitely don't forget to share this video with your friends, because not a lot of people actually know how to make use of these awesome cameras on these devices. So that's why I thought a guide like this will actually help out a lot of people not to not just use the basic photo mode, but actually use under camera modes that are available on your device because, like you saw there are some awesome modes built right into this camera.
So since you are carrying this in your pocket, why not use it to capture something sweet with that out of the way? That's it for this video guys until I see you guys in my next video. This is barn. Signing.
Source : Andro Dollar
Phones In This Article
Related Articles


Comments are disabled
Latest Articles


