How to Replace the Battery on a Samsung Galaxy S9 By Serg Tech
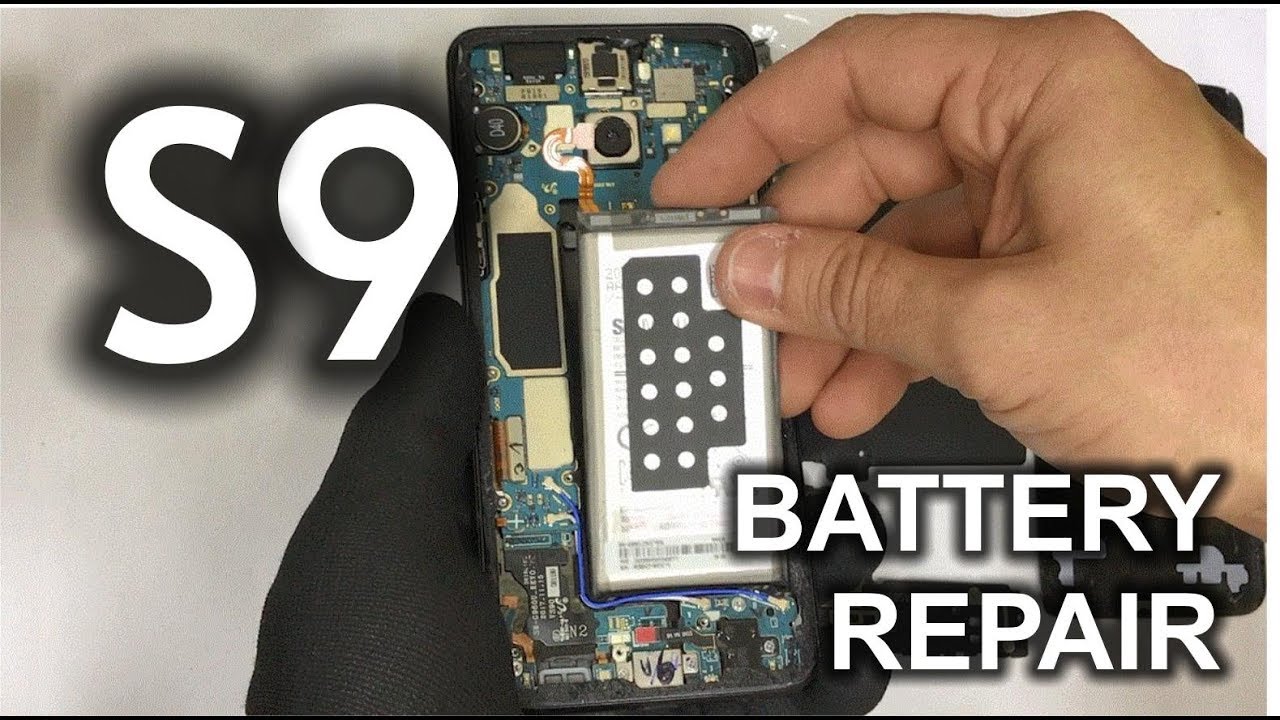
Hello there, everyone in this video, I'm gonna, be showing you how to take apart and replace the battery on your Samsung Galaxy s, 9. Welcome to in this channel we do tech reviews and tutorials. So if you need to the channel I, welcome you to subscribe all right guys, let's go right to the video now, okay, so first off, let's make sure that the phone is powered off. If not, then powered off next up, we're gonna need to give it some heat and on the back cover with either a hairdryer or heat gun. If you're going to use a heat gun, make sure to move around consistently, not staying in one spot so that you don't burn the inside of the phone, or you can set it on a hot plate, which is what I prefer to use as I'm going to show you here and I, set it to about 110 to 115 degrees Celsius and leave it on there for a few minutes until it's hot enough and keep in mind that we will have a link in the description where you can buy the parts and tools used for this repair. So here's some of the tools we're going to be using we're gonna, be using a suction cup.
We're going to be using some guitar picks. So once you feel the phone is hot enough, you may want to get it. We can also use a folded business card as well as a prying tool. Alright, so let's go ahead and get the phone while it's hot, and we're going to place the suction cup towards the bottom here, and we're gonna, give it some suction. Until we see a slight opening in between the glass and the metal frame of the phone, so continue to pull up gently on the suction cup.
Until you see a small separation opening up, if you see that the phone starts, cooling down, don't be afraid to give it some more heat so that the adhesive loosens up more so, as you can see, now we're starting to see the separation here, I'm going to stick the guitar pick inside now and there we go so just gently push in the pick and once it's in there you can remove the suction cup. So I'm going to use the help of another pic here you can use as many as you want. I'm going to use this one to wedge it in on this side of the back. So I'm going to use a third pick here, because I'm doing this very carefully we're going to go slowly down each side with each of the pigs, but first I'm going to give it some more heat as well to loosen up the adhesive. So here we go now that I heated up two more I'm going to continue to go downwards on each side.
As you can see, the pic is moving easier down. The side so continue to work downwards and take your time don't rush it. So you don't break the back cover if it's not broken once most of the back cover is removed, you can start pulling up from the bottom, and most of the adhesive will release, and then next thing you may want to do is wiggle it around a little to release any leftover adhesive on there, and the back cover will come off completely. Also remember to be careful with this flex: cable that connects the fingerprint scanner to the phone, so with the back cover now out of the way. The next step is to remove the 15 small Phillips head screws holding on the back frame of the phone so with a small Phillips head screwdriver we're going to go ahead and remove that next.
Next, up, we're gonna need to remove the back plastic housings here, so we're going to give them some pressure upwards. You can do it with the prank tool or, with your fingernail, be careful with this antenna cable here for the wireless charger pull up on the plastic gently, and it will come right out. It might have some adhesive still holding it on, but you can pull that right off. So next up we're going to pull up on the bottom part here, which is the loudspeaker, so we're gonna need to give it some pressure upwards as well, and remove the adhesive holding it on there. If the adhesive comes up a bit and just place it back down around the edges where it was before, okay, so once that is done next step, is we need to disconnect the battery flex cable to stop any electricity from flowing through the phone? So next up is we're.
Going to need to heat up the phone once again on the screen until it's hot enough, so that we can pry up on the battery here and remove it completely. So once you have your new battery that you're going to install just place it in the battery slot position, it correctly and connect the flex cable. So now we're ready to put the back covers back on. So we're going to connect we're going to place the wireless charger part of the back housing first, the top part so position. It correctly makes sure the adhesive is out of the way and give it some pressure downward so that it can click back in, and then we'll install the bottom portion, which is the loudspeaker so position that one correctly as well and click it in until it's fully in place.
So next step is we're just going to be placing all of these small Phillips head screws back on to the frame of the phone with the screwdriver. So once you're ready, let's go ahead and place the back cover back on the phone, so first we're going to need to connect the fingerprint scanner, flex, cable, so position it correctly on top of the connector and press it down until you feel it click there. We go so that one connected and then all we have to do now is position the back cover right on top of the phone position, the corners first, so that it aligns correctly and then push it down on all the sides, give it some pressure so that it can glue back down to the housing of the phone. Please keep in mind that, after doing this, your phone's waterproof rating will not be valid anymore. So this was just a quick video on how to take apart and replace the battery on your Samsung Galaxy S 9, alright, everyone, so that is it for this video I hope you enjoyed it.
If you did, please give it a like. It really helps the channel out a lot and, as always, I will see you around in the next video peace Joe.
Source : Serg Tech
Phones In This Article

Related Articles


Comments are disabled
Latest Articles


