How to Apply a dbrand iPad Pro (2018-2020) Skin By dbrand
If, you just got your D brand iPad Pro skin relax. This is going to be easy. First, wipe your device free of dust and fingerprints for optimal results, ensure you are under bright lighting. Note that your D brand skin comes with up to four elements: back frame, camera and pencil. A microfiber cloth is also included to help smooth down the edges. If you purchased a pencil skin, you will require a hairdryer for this installation.
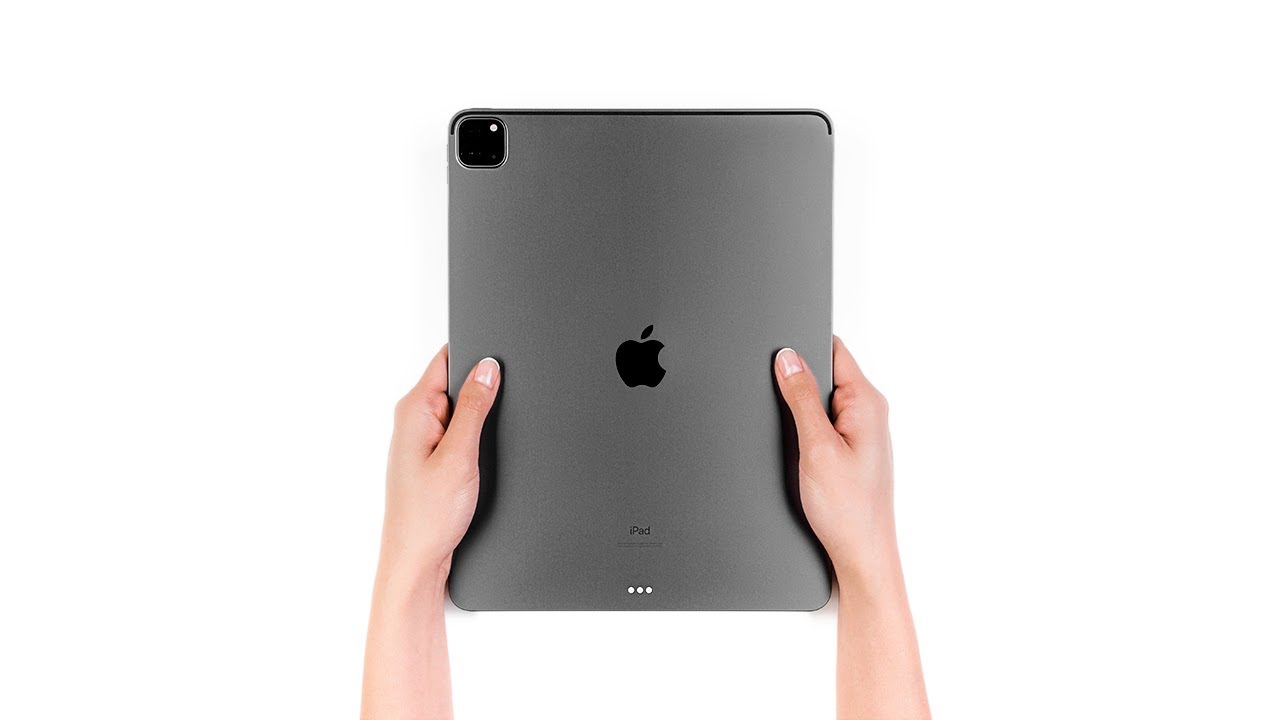
If this is the case, pause the video now and go grab one welcome back, don't worry if your exact iPad isn't shown the procedure is identical for all iPad Pro models. If you only need to apply a pencil skin jump ahead to the time shown on screen for instructions on how to apply your iPad skin, just keep watching. Let's begin with the back piece: remove the skin from the 3?m paper and reattach, as shown a line around the camera flash and microphone, ensuring that the top edge is perfectly straight. Even the slightest misalignment will result in the entire skin being tilted upon completion once lined up properly apply pressure to the exposed portion. Next remove the 3?m paper.
Reattach is shown and turn your iPad upside down a line around the smart connector, ensuring that all three cutouts are centered perfectly. Now that alignment is complete, apply pressure to the exposed portion. You may now remove the three in paper entirely and smooth out the back surface. Finally, grab your microfiber cloth and rub each edge 10 to 15 times this process will smooth down any sharp edges and make the skin feel like it's melting into your iPad. Let's move on to the frame skins note that each set of frame skins comes with five pieces, top right bottom upper left and lower left.
Let's begin with the top piece, be extra gentle when removing the frame pieces from the 3?m paper. Otherwise, they may stretch to prevent this simply readjust your grip on the skin. As you peel, as shown once the skin has been removed from the 3?m paper align the center portion of the skin using the microphone cutouts once lined up apply pressure along the top edge, continue wrapping the skin around the corner, ensuring that the volume cutouts fall properly into place. Repeat for the opposite side of the skin? Next, let's apply the bottom frame piece. The procedure is identical to the top frame piece chances.
Are you won't remember all of those instructions, so jump back to the time shown on screen? See you back here in a bit once complete. Your bottom piece should look like this. Let's move on to the right frame piece align either end of the skin so that it sits perfectly flush with either the top or bottom gently wrap the skin along the frame bit by bit, ensuring that the microphone cutout is properly aligned apply one more round of pressure to secure the skin in place. Finally, let's apply the left frame. Skin both left pieces are identical, so you can use either one align the flat edge of the skin so that it sits perfectly flush against either the top or bottom frame piece once lined up wrap the skin along the side of the device until the curved end falls in line with the magnetic connector repeat, this process for the remaining left frame piece apply a round of pressure to secure the skins in place.
Finally, let's take a moment to smooth down any sharp edges, grab your microfiber cloth and rub each edge ten to 15 times this process will smooth down any sharp edges and make the skin feel like it's melting into your iPad. Next up is the camera. Skin installation is simple, just use a toaster you, let's now install the pencil skin note that you're deb rand pencil skin comes with four elements: eraser band body and wood. Two sets are included just in case you've been up on your first try. A microfiber cloth is also included to help smooth down the edges.
You will require a hairdryer for this installation, so pause the video now and go grab. One welcome back begin with the wooden piece. You'll need to align the skin around the indicated divide below the tip of the pencil. If you don't line up the wooden piece properly, the entire installation will be ruined once aligned correctly continue. Wrapping around the tip of the pencil you now, let's take a moment to smooth down the wrinkles grab your hairdryer and heat.
It up then apply firm pressure to smooth it out. Let's now move on to the body to get a perfect installation line up the skin against the edge of the flat surface on the pencil. Once you have, the initial alignment complete continue. Wrapping the skin around the pencil, applying pressure from the center outwards repeat this process for the metal band. Next wrap the eraser around the cylinder, leaving the tiny flaps unstuck grab your hairdryer and heat the eraser from the top down once the material softens wrap the flaps inward next up is the dot note that there are three sizes included to help you get a perfect fit.
Try the smallest one on the left. First position, the dot on the tip of the eraser, then heat it up and apply firm pressure to secure it in place. Finally, rub down the eraser with your microfiber cloth to smooth down any wrinkles done. If you have any questions, you know how to reach us.
Source : dbrand
Phones In This Article


Related Articles


Comments are disabled
Latest Articles


