How I Take MATHS Notes on My iPad PRO 2020! (maths student) By Harry Surplus
Hello everybody and welcome back to a brand-new video. I do hope you are all well now for anybody that doesn't know. My name is harry surplus, I'm 18 years old, and I very recently started my math degree for the past month or so all I've been doing is math. I've been at home, and I've been taking so many notes. I've been taking notes for around about six and a half seven years, and really I've only just started to perfect my notes. So in today's video I want to share my notes with you and how I take my notes.
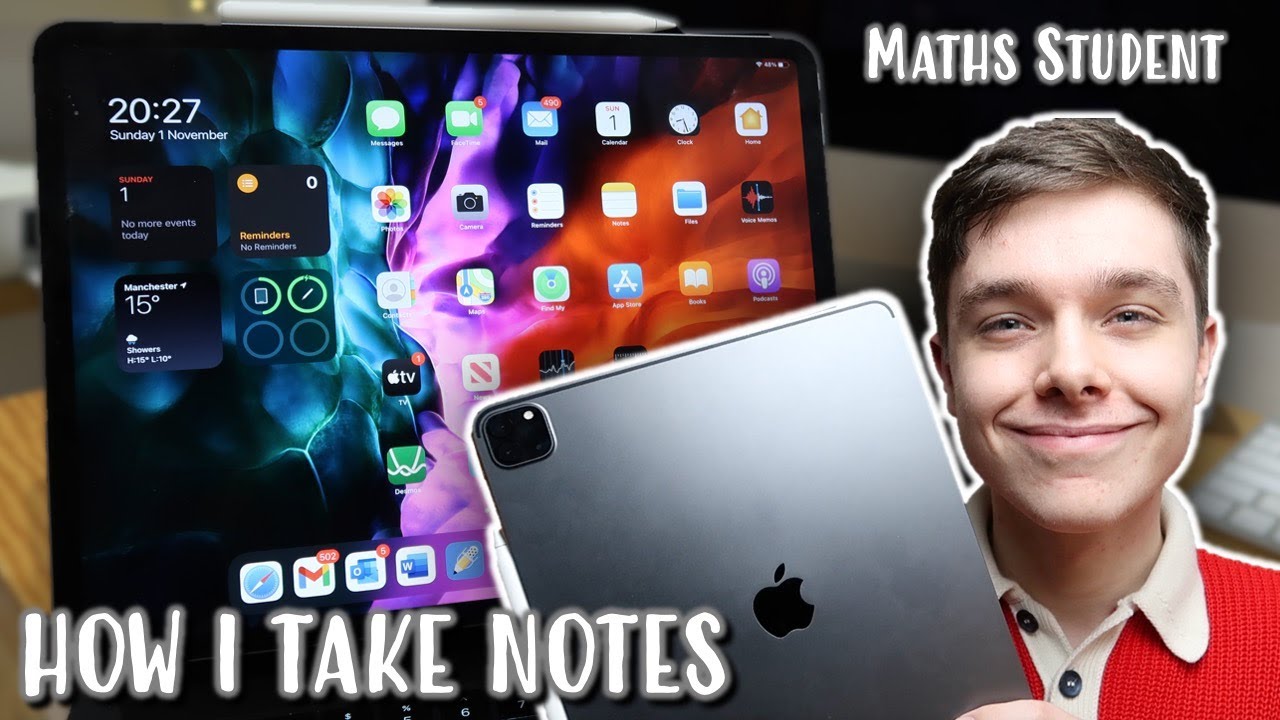
This video will be split up into around about five sections, I'll leave them on screen here. They are all time stamped in the description down below. So you can jump to a certain section if you want to the first section in this, video is accessories and the iPad itself. So this is the iPad that I have. It is the iPad Pro 2020, it's the 12.9-inch iPad, and I'm not going to be dramatic. It's amazing! I don't know what I'd do without this.
The whole of my degree is on here, of course, to take my notes: the only pencil I think that works with this one is the second generation Apple Pencil, it's the one that is magnetic, and it sticks to the side. I think this pencil compared to the first generation pencil is like ten times better. It has, if you've, never seen it in real life, a matte finish now. I don't think it's going to focus. It says Apple Pencil there.
No, it's not gonna focus, but it's got a matte finish, whereas the first generation Apple Pencil had like a glossy finish and it kind of was slipping through my hands. Sometimes the first generation one and it was quite difficult to write with sometimes, but this one is just so much better and also because it sticks to the side it just charges when it's on there. I'm sure you know all this, but that was a perfect feature for me, because I'm always taking notes- and I don't want it like the other one where you had to put it into the port at the end of the iPad, because that was just a silly design. You ended up kind of walking around with an iPad and then the pencil was stuck out the side like that, but with this one all you have to do is clip it on there, and then it's charging. Oh, that's Oreo.
By the way. Now, as I do a math degree, I don't really have typed notes. However, we do have a math workshop, which is part of my math degree. It's a course, and we do a lot of coding at the minute I've done coding in Matlab and in latex, and it is very useful to have a keyboard. So that is why I also have the magic keyboard.
I actually wasn't going to get this. I was going to buy it with somebody that I saved up, but I was a little unsure because I thought am I really going to use it because I'm not going to have much stuff to type up and obviously in Matt you write a lot more than you do type, but I actually was surprised with it for my 18th birthday, so this was a present which I was very, very pleased with, and I've been using it to code. Basically, what I do in lectures is, I will have the zoom, because obviously it's online I'll have the zoom workshop on my laptop, and then I'll have my iPad and I do the coding on my iPad. The keyboard is amazing. It is quite similar to my iPad Pro.
No, that's, not an iPad Pro, my MacBook Pro here. The only difference, I would say really is: it's got a little more of a retraction. I don't know whether you can hear that, but it's really compact, it's great. You can literally just pop the iPad down, and it's gone away, and I love that it's floating as well. I also use the keyboard for typing up video ideas.
I have notion on my iPad. Furthermore, I sometimes just use my iPad like a computer and the cursor is like incredible. The is really responsive. You know, there's no lag on the screen, and it's just amazing. You can put your iPad on, and it instantly connects to your keyboard.
Now when I'm not using my keyboard, I do just have a basic case for my iPad. It kind of looks like the keyboard one really, but obviously there's no keyboard in it. It's just a generic case. Fun fact. I actually got sent two of these cases when I ordered them, like a good boy that I am, I said, hey you've sent me two cases.
What do you want me to do with the second one and the email back saying just keep it, so I've got this one? I've also got another one. So if this one ever gets broken, or it gets damaged, or I lose it, I've got a free one on this case here, there's this little flap, and basically it hooks round. So when you've got your iPad in this case, the Apple Pencil sits here, and then you can just flip that around, and it protects your Apple Pencil in there. Let me show you so here's a nice demonstration. My iPad is in that just flips over the pencil is there on the side, and then you can just pop that over.
So no one can get to your pencil. If you want to have a look at this case, I will try and remember the website that I got it from, and I'll leave a link in the description down below not an ad, not paid to say that I literally just bought the case, and it's very, very good. So I'm telling you about it. The next part in this video is iPad notes versus paper notes, short answer, iPad notes all the way it was in my final year at sixth form that I purchased the first generation Apple Pencil. I already had the 2016 iPad Pro then, when I bought the first generation pencil, I thought I'm gonna start taking my notes on my iPad and I never looked back.
I could literally walk around college with one device with all of my notes on yes in the first year. Furthermore, I did them on paper, so you probably can't see the folders behind me here. Those are my first year notes, but in second year all my notes were on my iPad because I'm doing math I of course make a lot of mistakes when you're on paper. If you've done it in pencil, it's quite easy to rub it out. Sometimes you do leave a smudge when you're in pen, you have to scribble, get your tip x out, but when you're on an iPad, all you have to do is switch to the eraser, wipe it, and it's gone.
My organization system on my iPad is like a hundred times better than those one, two, three, four, five, six, seven, eight nine folders that are sitting over there. I can search for notes if I title them correctly, which I do I can search for set functions. I can search for complex numbers and my notes just come up. It's really easy and also fun fact. My teacher in college, my old math teacher she used to do her notes on paper, but when she saw I had an iPad, she emailed me, and she said harry you've made me get an iPad.
She uses notability like I do, and she does all the solutions on there. So not only am I making my notes on my iPad, I'm influencing my old teachers too, as well. The third part in this video is 11 inches or 12.9 inch. This was the biggest sort of problem I had when I was thinking about what I thought I was going to take notes with. For me, I wanted the biggest space possible.
I wanted the best one I'm going to use it for three years. I wanted to make a little investment and really make the most of what I was buying. Furthermore, I didn't want the 11 inch to be too small, and I didn't want the 12.9 inch to be too big. Furthermore, I wanted a screen that was big enough for me to write and also big enough for me to write if I'm using split screen, which I do quite often, and I have to fit so many math the screen- it's great that I've got such a big display. So that's why I'm so glad that I went for the 12.9 inch. Now, I'm going to be talking about the app that I take to use my notes and if you've watched some of my vlogs before, or you've watched other videos of mine, you'll know that I take my notes on notability.
Let me show you my iPad screen. This is what I see when I open up notability. Basically, it works like a folder. I have all of my organization on the left here and on. The right is what is in the folders these things down the side that have different colored blobs next to them are called subjects.
Then you can also have dividers, which you can put subjects into in the dividers. You can have separate subjects I like to use the dividers as one thing for my course. I have some older courses here copy one copy of two decision further pure with from further math a level, and then I've just got some uni prep work in there. We've got the different subjects that I did to prep for uni and then the four dividers at the bottom are what I use for university. Those are my four courses.
The subjects at the top that aren't in dividers is just because they don't really fit in a divider. Now I'm going to show you the dividers for my degree work. So I've got four courses here and in those dividers for my courses, I split the subjects up into weeks. Let's have a look in language of mathematics. You can see.
I've got nine notes here. What I do at the start of the week is I like to import the lecture notes into the subject folders in the dividers. I call it LN for lecture notes and then the name of the lecture. So you can see here. I've got lecture, notes, language of mathematics, and it's really, really easy notability to do that, all you have to do is go to the PDF.
So let me go and find it on the internet. So let's go to my course foundations of pure math. If we go to week one, I can see all the videos that my lecturers made here, and I can go to lecture notes at the bottom. I'm going to open them up properly in a new tab, and then I press the little export button in the top right, and it's a PDF. I can just import it straight away to notability.
Furthermore, I can create a new note. Furthermore, I can choose the subject and I want week one language of mathematics, and I'm just going to call it hello video then. If I click import, it will import all the pages. It's right there. Hello, video, really, really easy as well to delete a note.
You just swipe it and press delete, there's a little bin at the bottom here, and these are all my recently deleted notes. So if you accidentally delete a note, it's really easy. Just to put it back on your iPad, I'm sure you can see that I've also got some other notes in there. What I have is notes that I take during my lectures, or they're, actually called review sessions now they're online, but I have notes that I take. Then we also have videos to watch before our lectures.
So I take some notes, whilst watching the videos and then any worksheets or exercise sheets, that I've done in supervisions or tutorials they're, also in the correct folders, sometimes as well. We'll just have some random notes that I've done whilst doing a quiz or that I've just done some rough working, and I'll put those in the correct photos as well. If we were just to create a new note here, let me show you sort of the settings that I have for each one of my notes. As you can see here, I have some favorites, so I'm highlighting it there in red. These are my favorite pens.
Those pens are the ones that I use every time, I'm taking notes. You can't actually change color here. If you just press the pen, and it will bring up the thickness, the style of pen that you want and the color. What I did is to make my life easier. Put them in favorites so that all I need to do is just tap, and it will change the color of the pen.
I have certain colored pens for whatever I'm writing. So I like to do my main writing in black. I then like to do some notes, or some annotations or graphs in gray. Then any formulas or anything important I like to do in this sort of pinky red, sometimes I'll, highlight it in pinky red. Instead of actually writing it in red.
I don't really have a set color for orange, so orange is really just kind of anything I like to use blue for markings or any corrections that I do when my supervisor's going over some sheets for green. I just do anything in green really. Furthermore, I also use this lighter green here kind of a blue color again for just anything and the same for this lighter blue here now. Let me take you through my highlighters. I have the thickness on the one on the second row, the fourth one along I use the yellow highlighter for any answers.
Then the next color that I use is this kind of pinky red color, and I use that. Sometimes if I've got formulas or important information that I really need to remember I'll either, like I said, write it in this color or highlight it the green I use for definitions, propositions remarks. Anything that's just come straight from my lecture notes that I know is correct, and it's a definition that I need to know I'll highlight it in green. The next color I use is the light blue and I use that just for general highlighting now you can't really see the gray, but I use that behind titles I won't lie. Sometimes I forget to do that, and I think oh actually, I need to highlight it in gray, but those are the five highlighter colors that I use.
I should also add that there are two pen styles in notability. If you look there are two styles here this one, it doesn't have any pressure, so you can't push down on your Apple Pencil and the pen get thicker. I used to use it. It's the second one along here, and you can see as I press hard on my Apple Pencil, the pen gets much thicker if, as well, I'm ever drawing something like an asymptote on a graph I'll use the dash lines. These are really, really useful, especially for me that does math.
You can see it's a dashed line. There are also some great features of notability. That kind of makes me stay with the app. As you can see here, I've got a voice recording button. It's a little microphone at the top here.
If I hit record, you can see that it starts recording and what that is doing is recording my voice and anything around it through the microphone, but also it's recording the notes that I take so let's say we selected this dark blue and I wanted to write hello, everybody now. What I'm going to do is I'm going to stop that recording and if I press the drop-down arrow everything goes gray. Apart from the writing that I had done before I hit record and then, if I press play, you can see that it starts recording. You can hit me talking around it back the microphone and then, if I use this over here, I can slide to where I start writing. So there you go, you can see its filling in.
If I think I really don't understand the explanation to a certain question I can skip to where I was writing that question and then listen to what the lecturer was saying. So here we are, and I wanted to write hello, everybody, and then it's writing, and I can see me actually writing right, be quiet. What you can also do at the top here is: if you press the plus button, you can do a document scan now. All that does be open up your camera and if you had a document in front of you, you'd be able to place it down, hit the camera, and then you're able to resize. Let's say that was my document there, and you can keep the scanner.
This is not going to work great because there is no paper there, but if I did what it does, is it takes a picture and converts it to a scan. What I also do with my exercise sheets is, I take a screenshot from the actual sheet and copy and paste it into my notes. So you can see here. I've got question one. I've taken a screenshot of it, and I've done the answer to it.
Next to him. I didn't do this right from the start. There was an idea that I had only a couple of weeks ago, and I thought it'll save me time and I just take a screenshot and, let's just crop it. Let's say that is the question that I want. My iPad crops it for me, I'll press, the export button, and I'll just press copy, then I'll delete the screenshot, and then I'll just paste it into notability.
Now what I'm going to be talking about is how I take notes to prepare for lectures, because my lectures are online. We have what's called blended learning and what I do is I have videos to watch before my live lectures on zoom. So, let's just say we're creating a note for those. So let's create a new note in my foundation of pure math course. I will change the title of the note, so I will tap, and then I will scribble out to get rid of it.
The new feature is very, very useful and then let's just put iPad video as the title. Hopefully that will register perfect. I don't then rewrite the title in the actual document, because I never really print these off it's kind of pointless if I print them off. So I just keep the title in the actual title section. Then what I will do when I'm watching the video is, I will hit record, and it will record the audio like I said, and then I can follow what I'm writing and what the lecturer is saying at certain points.
Within the note. Another thing that is really, really useful is picture in picture mode when I'm watching the videos I'll sometimes have them on my laptop, and I'll, be taking my notes on the iPad I'll have them on my Mac, and I'll be taking notes on my iPad. But what is really, really useful is picture in picture mode. So let me go to a video that my lecturer has on blackboard, and then I'm going to make it full screen, and I'm going to press this button next to the cross in the top left and what it does is it puts the video in the corner of the screen. Then I can go back to notability, and here I've got my lecturers video, so I can hit play, and then I can take my notes, as my lecturer is talking really, really useful.
If I'm writing in the top right, I can just move the video out of the way and carry on right in here and then, if I'm writing towards the top again, I can move it to the corner, or I can just pinch the video and make it small. Whilst it's on pulse, I use the pen settings that I mentioned previously in the video to actually format my notes and make them all look the same and that just works best. For me. That is how I prepare the notes are as neat as possible. I use the format settings like mentioned previously.
I will take notes from the video I'll import my lecture notes at the start of each week or at the start of each video so that they're ready for me now. Let me talk about how I take my notes in lectures. Like I just said, I do take notes before lectures. So I've got everything ready, but it is not always the case. Sometimes I don't have time to do that and in that case, which is very rarely, but sometimes it is, I think, I'll just make notes again in the live lecture.
The downside of that is that you are gonna, have to make rough notes if you're taking notes in lectures. So what I do is I'll take rough notes. I won't bother formatting my notes with highlights or different colored pens I'll do everything in the same color so that I don't get behind on what the lecture is saying and then, after the lecture I'll go back and amend my notes. If I need to I'll highlight them I'll underline I'll box things off just make them look much neater, and that way I can use my notes much more effectively when it comes to revision and because it's math and things come flying out of everywhere, equations can just be plucked out of thin air. In a math lecture you can easily get lost.
You look down to take some notes. You look back up at the screen or at the board and everything's changed. So that's why I try and take rough notes, and then I go after the lecture and amend my notes and format them. That is all I've got for today's video, if you did enjoy, please make sure to give it a big thumbs up and subscribe down below. You can follow me over on Instagram and other social medias as well.
If you want to like, I say you don't have to it's just there. If you want to thank again for watching everybody- and I will see you very, very soon, with a brand new video bye, be quiet.
Source : Harry Surplus
Phones In This Article
Related Articles


Comments are disabled
Latest Articles


