Galaxy S8 Cracked Camera Lens Replacement By JerryRigEverything
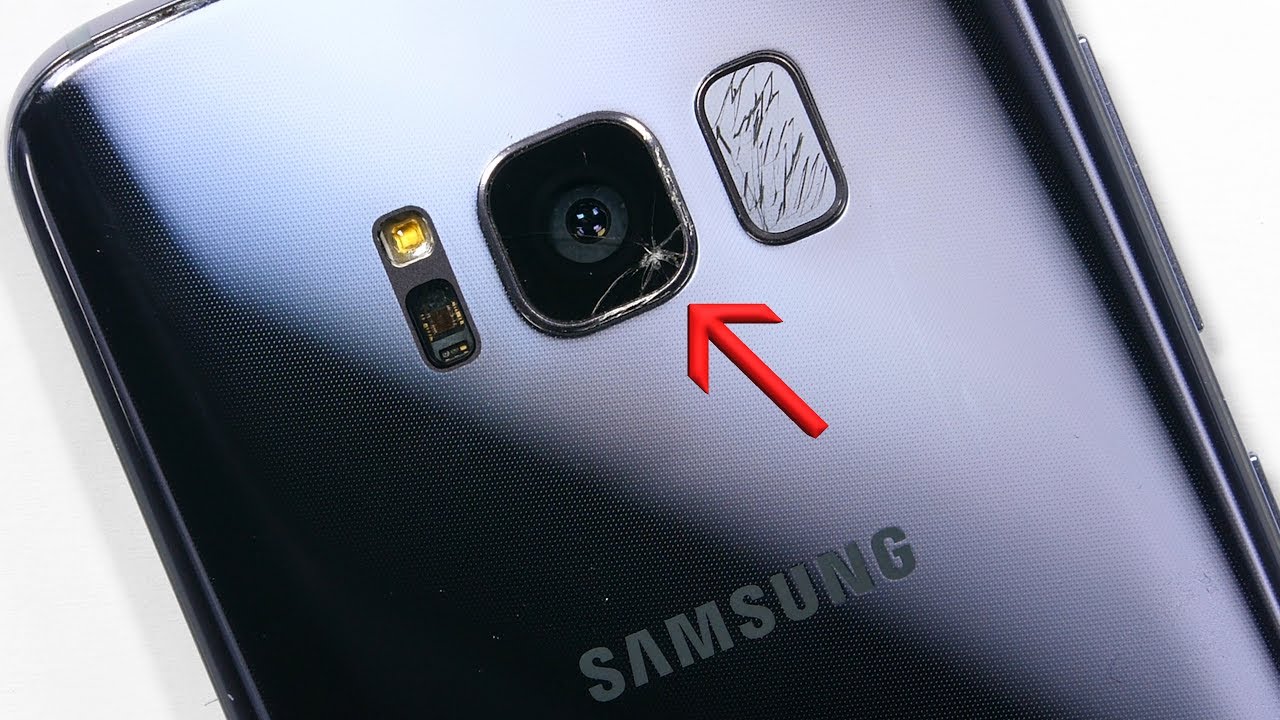
If you have a cracked camera lens on your Galaxy S8, don’t worry, it can be replaced on its own for cheap – without opening up the phone. And the repair doesn’t take very long. It is pretty tricky though, so make sure to watch this video all the way through. Let’s get started. The exterior protective camera glass for the Galaxy S8 and the Galaxy S8 Plus is the exact same size on both phones. The clear glass has no focusing abilities, it’s just a little square clear protection.
The main thing holding the glass onto the phone is some really strong adhesive. This adhesive can be softened with some high heat. You can use a hair dryer for this…but since I don’t have a hairdryer, a heat gun works just as well. Once the glass is warmed up until it’s just barely too hot to touch, you can pick your starting point. Mine’s going to be the center point where the glass is broken.
And then try to lift off the camera glass without dropping any glass shards or dust into the camera unit below. The reason you don’t want any glass falling inside of the camera unit is because in order for the camera to focus and stabilize, the camera has to physically move, and if glass dust is caught down inside of the unit it will block that movement making the camera unable to function. So, keep the dust and any new glass breakage during this removal to a minimum. Feel free to warm up the glass if the adhesive starts to harden again. After the big chunks are gone make sure to clear that adhesive completely out from inside of that metal ring.
If there are any little niblets of adhesive or bits of glass dust, when you press your new lens into place, the new lens will shatter because of that pressure point. I’ll use the sticky side of a piece of tape to try to pick up any remaining shards of glass inside the metal frame. And here you can see what I was talking about earlier with how the camera needs to physically move around in order to stabilize itself and focus. A good replacement camera glass took me a long time to find. There are a lot of plastic imitation lenses on the market and nothing works quite as well as glass does, and these bonafide hardware camera lenses are real glass.
I’ll link these lenses down in the video description. It’s not a bad idea to get one as a backup or maybe get two if you’re actually attempting this repair on a Galaxy S8 because one might break during the installation. It is glass after all. Make sure there are no fingerprints or dust on the underside of that glass before you plop it down into the little square on that metal frame. I’m using a clean cloth to just brush off any prints, and then I can remove the adhesive protection.
Then I’ll drop the lens into place. Gently situate the glass inside of that metal square. This is where most people will probably break the replacement lens by applying too much pressure. As a side note, even though there is adhesive surrounding that lens, I still wouldn’t trust the replacement to be water-resistant. And while that might be slightly disappointing, a cracked camera lens isn’t water-resistant either.
The little yellow blip you see on the screen is from my Galaxy S8 durability test a while back – it’s not from the camera. It looks like my focus is working and the camera is taking clear pictures. A tip if your camera stops focusing is to open up the camera app, turn the phone camera side down, and do a couple sharp taps on the screen to jiggle any dust out of the camera unit. If that doesn’t work and the camera doesn’t correct itself after a few days, the camera unit might have gotten damaged during the glass breakage. Replacing the camera unit is also pretty inexpensive, but it does require opening up the phones.
I’ll link the repair video in the video description if you want to see how that is done. If this video helped you or you thought it was interesting, hit that subscribe button and come hang out with me on Twitter and Instagram. I’ve linked all the tools and replacement parts in the video description right below this video. And thanks for watching. I’ll see you around.
Source : JerryRigEverything
Phones In This Article

Related Articles


Comments are disabled
Latest Articles


