Dji OM4 Gimbal Review iPhone 12 Pro - Best Gimbal for Smart Phones - Tips and tricks. DJI Mimo App By J Tech WP
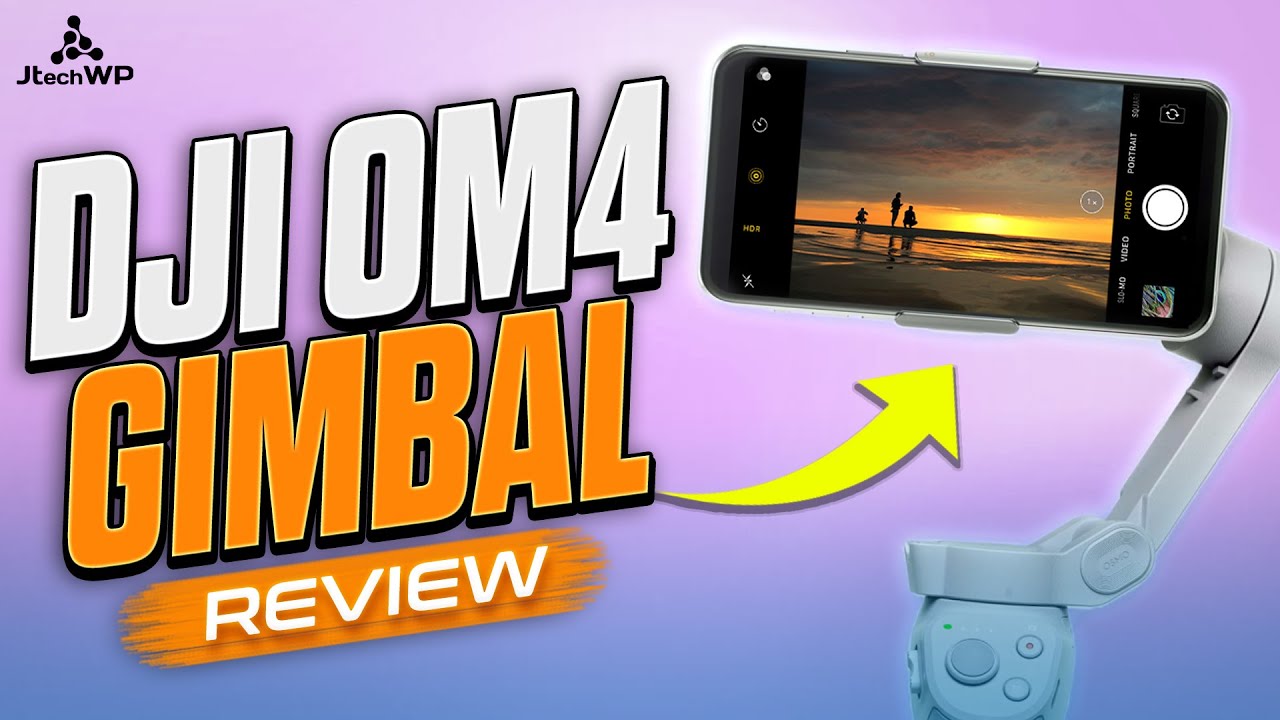
Hey guys and welcome to tech WP in this video, I'm going to be reviewing the DJI om4 gimbals for smartphones. Is this gimbals good enough for professional use? Well, I think it is. I use it for my clients websites. I do photos with it and professional videos. Overall, the client's been really happy with the results, if you're interested in learning more about how to build websites or filming or video editing, I've got courses for each of those and there are links in the description below I generally shoot in 4k 30p, using 10 bit color and at a bit rate of 120 megabits, a second with film pro. The controls are really well-thought-out with a power and mode button combined, then you've got a joystick for left right up and down and a video record button which also works for stills.
On the left hand, side we've got a zoom in and out switch, so you can move that to zoom in and out smoothly double tap the trigger to balance the gimbals and level it out and hold it down to lock the gimbals in place to power up the gimbals long press. The power button and then the lights will show up, and it will show you your battery status and the gimbals will self-level, and you're ready to go for this review. I'm going to be purely looking at the gimbals itself and the DJI memo app one great feature about this gimbals is that it works with film pro. So, if you're doing any professional work, I'd use that, if you're just doing it for fun the DJI memo app is fine, and it also works with the built-in camera app on the iPhone. It connects using the Bluetooth 5.0. So it's really low power.
The battery lasts for about 15 hours, and it takes about 2.5 hours to charge on the side of the gimbals. You can also power up your phone. So if your phone batch is running a bit low, you can plug in an USB cable into your phone and take power from the gimbals to keep your phone going if you're running a bit short on power on a shoot. If you're looking to buy the om4 there are links in the description below, I only test out the features most people are likely to use like the active track.3.0 the hyperlapse panoramic modes and just general filming use. I've been using this gimbals a couple of months now and overall, I'm super happy with it and glad I bought it.
It's made my job a lot easier for going to do client work like websites, shooting holiday accommodation, because I can flip between the wide angle and the normal lens. We took a spin to pop it sands in Pembrokeshire, and we did a little hyperlapse on the way driving my van the setup's, really quick, pull the gimbals out my pocket open it screws in the tripod legs phone out line up the dot with the other dot power it on a boom you're good to go! That's how fast the setup is when it first starts up. It's in portrait mode, double tap the m, and it'll flip it to landscape mode, press, the red button, and it'll start recording you've got a controller stick, so you can move it left right up or down and to recenter it. I double tap the joystick and that will recenter the gimbals. The controls on this are really well-thought-out.
If I hold the trigger it locks the gimbals on a target. If I lock it on my camera man john, I can move it and the gimbals is trying to track him. So I can move it up and down it's trying to keep his head in the center, and it's got a really smooth pan on it. So I can pan to the right and as I stop, the camera will move smoothly round. If I pan to the left, it smooths out the movement for you making it look more natural, we're quite fortunate.
We found a dog, so I'm now going to test out the active track, so it's locked onto the ROG and if the owner could throw the stick for us. Okay, so clearly active track's, pretty useless on the Spaniard. Okay, so active track. That was an epic fail, really doesn't work on spaniels. However, we track people, let's see if we have a bit more luck.
So if I track this gentleman in the hat owns the dog. Ah, there we go. Our active track is good on humans, but it's not very good for spaniels. You can even flip the gimbals upside down, so just by moving it like this, it reorientates itself, and then I could film low to the ground, and then I can take the camera, nice and low. That gets you a nice low angled shot, and it's also got a really handy, selfie mode.
I can just press the button in the top right corner and there we go we're in selfie mode. So now it's recording my face, so this is kind of handy if you're doing a vlog, so I've got a decent mic here and that's been recorded on the canon r6, but you could, if you wanted, to connect the camera mic to the iPhone. What I'm going to try next is making a piano. So I've put the tripod on top of this log, which is fairly level. I then go into piano mode, and it's making a three by three put my hands on the gimbals to keep it steady, and now it's going to go through a little process, snapping away, and it's all automated.
So you don't have to do anything, and now it's generated a perfect panorama in the camera, which is pretty cool. What I'm going to do now is try a stability test jogging through the sand dunes. Let's go just for comparison, I'm going to try and do the same run without the gimbals, so this is purely on the camera stabilization and see how it looks even just looking at on the screen, there's a huge difference between using the gimbals and not using it. It's pretty shaky running freehand. So definitely gimbals is a really good thing to have for this sort of work.
I'm going to give you a couple of tips on how to get better gimbals shots, starting with the gimbals walk when you're working with the gimbals. I always have the gimbals tilted slightly forwards, so I'm just walking from my knees like that to get a nice smooth shot as this reduces bound and keeps the gimbals a lot smoother. So I'm walking through my knees, nice and smooth two hands on the gimbals when you're doing a piano shot, you're going to be nice and smooth. You want to make sure that you turn through your shoulders slowly and smoothly. If you go quick like this, it will look crap.
I've got a nice firm stance here, so I feel pretty solid. I've got the gimbals tilted slightly forward, I'm just going to frame my shot a bit more using the joystick, and then I'm just going to twist from my hips and my shoulders from right to left nice and slow. Does it slower is always better than faster and there we go. You should have a nice smooth piano, and you could do the same, go in the opposite direction. So if I go from left to right, I just twist my shoulders, nice and slow, and then the gimbals will smooth that shot.
For me and here's a bad example. This is what it looks like if you go too fast, that's way too quick, and it does not look cinematic at all. So you can see on the screen. I've got nine grid lines, that's basically the rule of thirds. If I bring my camera down a bit, so I've got one.
Third is the sky one third of beach and the lower third is the grass. So that's the shot that could work. I could also bring it down even more, so now I've got a lot less sky. I've got more beach in the foreground and also more grass in the foreground. So you can use that as a rough guide.
It's got a dynamic zoom function on it as well. So if I scroll this way to diner zoom, we have an idiot-proof guide, so we can move out or move in. So it says, move away from the subject during shooting or move closer. If you're zooming in we can press done. Okay, so put my green box around it, hit the record button and start moving backwards.
Ah, that's looking great. I'm going to try the move in one so the hand symbol saying draw on it. So I put my box around my subject, and it says: move in press record, and I've got to walk towards it and press the red button, and it's creating our video I'll. Give it a couple of seconds and see how it looks to do a nice reveal shot, get a stable stance, bring the camera nice and close to your subject and then lift it up really slowly and there we go. That's how you do a reveal shot.
You can also do them from the left and the right and when you're done with your shoot, long press on the power button and the gimbals will orientate itself, take your camera phone off, and you're good to fold the gimbals up and put it away. The only negative things I have to say about the gimbals is actually the DJI memo app itself. It just had a few little annoying bugs in it like. If I was filming in 4k 30 on the main software, then if I went into like a hyperlapse or a time-lapse, it would go down to like 720p, and sometimes I didn't realize, so they've been mega dropping quality. That was the only thing that really annoyed me about it.
There's nothing wrong with the gimbals itself, when I'm using film pro I put in my settings and that's it hit record. I know it's going to be 4k30 for everything that I'm doing overall, it's a brilliant gimbals to use for the price. You get amazing, cinematic shots, lots of functionality and features in the apps, and I'm super happy with it. If you found this video helpful, please don't forget to hit that like button and smash that subscribe, and I'll see you guys on the next one.
Source : J Tech WP
Phones In This Article
Related Articles


Comments are disabled
Latest Articles


