Spigen Apple iPhone XR Tempered Glass Easy Install By Ashutosh Thakur
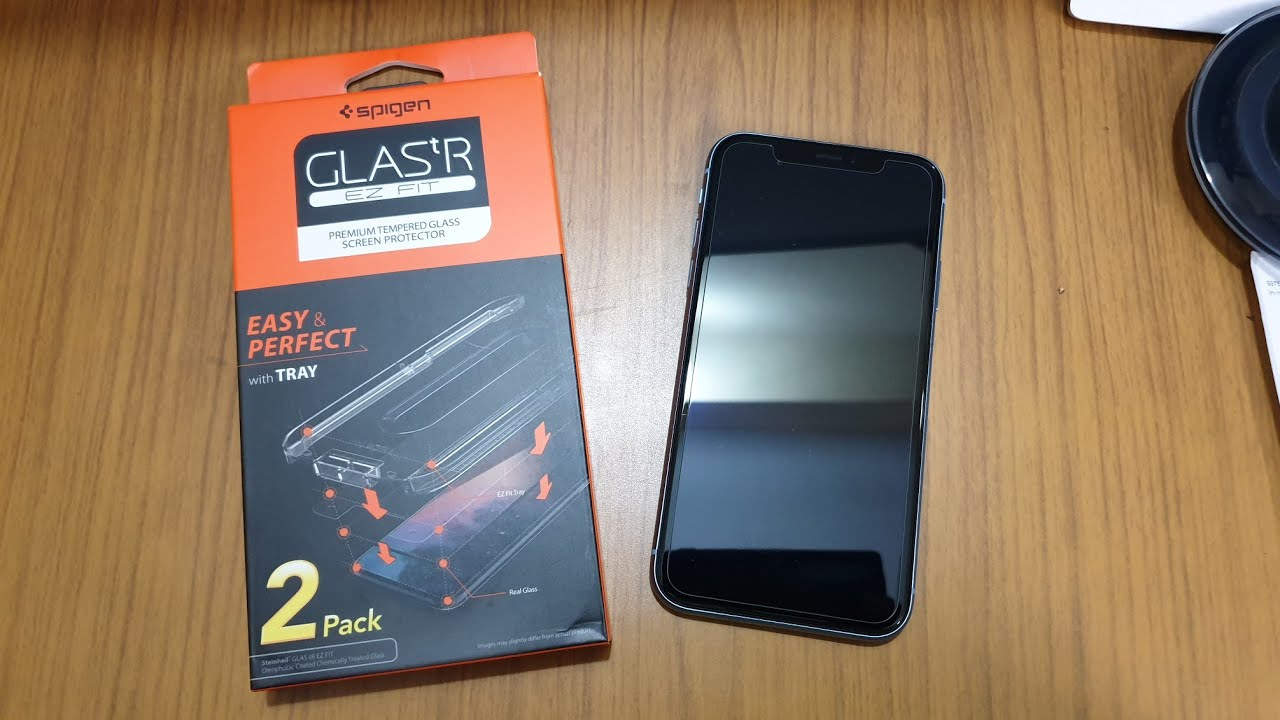
Hello friends today, I am going to show you the sign tempered glass for iPhone 10. Now, as you have seen on my last video, and you might be knowing that a have got a knife antenna, and we have to protect this phone from any drop or scratches to this beautiful device. So, as you can see, I haven't peeled off the company's twittered protection film for the whole phone. So this is what I wanted to share with you of my friends. If you have are going to buy a costly phone, don't open anything just buy the accessories first and install those on the phone to protect it before removing any company installed production films. In that way, what happens? You will get good quality of installation without any dust particles inside this display.
So why wait? My friends, let's open this product, as you can see here, it has my stand here. You just need to get this tab like this. We get the whole pack. This is a different installation kit, as we get from sign for other devices. This has an easy fit tray.
What happens in this straight? You need to your need to put tempered glass here, and you will be putting the phone here like this and if you need to press it up against the phone. So I will show you. The whole process step-by-step bear with 9/5. So here what we get, let's check this out. We get rubbers tool to squeeze some air.
There is some cleaning alcohol wipes, and here is the installation process how to do it. Let's see. First, we need to clean it wipe remove the protections film that is installed on this tempered glass earlier, and you have to put that film. Okay, it is already here, as you can see, the tempered glass is already here. It is already added area.
It has mentioned me to tempered glass over. There are two, so if the pack is mentioned to pack, then you are getting two kits here. These are the two kids like the one kit is for one installation. Only so you need to remove the production film yeah. Then you need to put it on top of the phone here, and we need to swipe like this and hole sticker.
You need to remove the whole sticker, then you need to remove this on and there is a protective film on top of that tempered glass, ? and that is to be needed to remove out and then use this squeeze to squeeze out any of the air bubbles. So let's do this, it's a very quick process why we will waste the time. Let me ready my desk. First I will skip this part. So here we go my friends, so first we will peel this sticker out very carefully, and it's better.
So, as you can see, I have removed the one side of it, and I've kept it like this and when we remove it, we're doing very carefully just remember to switch off all the fans and everything while doing this process, because if you do it, while any fan is on anything, then you will drop dust particles on it. As you can see, it is totally clean now and there is nothing on top of this display like there is not a single dust. Particle and I would suggest you to use this form because it will not scratch your back of the phone. So, as we had earlier learned about this kit, I'm not going to put an end risk as we have learned about the skate, we need to remove this first, like you have to remove this one. So I would suggest you another thing while removing this product a film, do it facing down? Okay, never do it facing up, because it will also attract these particles.
So why wait? My friends? Let's give another look. If there is any dust particles on here, I see your dust particle here, so I need to take some stickers to remove SNIM some dust. I have a dust removal sticker here. So, as you can see, this is a dust removal sticker. You use it very carefully if you have any dust particles here and don't use it, if you don't have an interest because so, as you can see here, I have cleaned all the dust particles that I was doubting.
It was on top of the phone. So, let's move ahead and install the tempered glass because the more I keep it like this, the more the dust will fall here. So why wait my friends? Let's do this I have kept my phone on, but you can go ahead and switch off your phone, but what I do is after I, after I install it, I usually check it using the phone display. So I am going to open this now, so I'm, getting really careful and now was about it, because this is my first installation -. So, as you can see here, I have faced it down, and I'm opening this film up, and I need to put it on top of the phone.
Ok, so be really careful about it, so I have removed it. Bringing the phone here I see some dust particles here, don't take any risk about dusts, because if any dust then now you need to put it like this, so it will stay here like this like it where it will stay, they dropped stress. Yes, I'm getting nervous, my friends, so it will stay like this. Now this press here. Let us mention press here and slide it down.
Okay. Now we have to wait for 30 seconds as it is mentioned here. So as we had discussed this installation earlier, and this violet takes 30 seconds to air, so in the meantime, I will discuss the second process. The second process is that, after I swipe, we need to open this whole sticker like this sticker. Please wait for 30 seconds and then remove it.
So it is very easy. I think speakings should provide these kinds of installation for all high-end phones, even the Samsung one, so we are going to it is already 30 seconds. So we are going to remove this, be very careful about my friends because, okay, we are going to be very careful about it. The sticker is really hard, as you can see. Okay and tear the bot, so I will keep the sticker here.
So the next step is after doing this, you need to move this tree out of this year here. So, as you can see, there is no tempered glass here. It is already installed on this four okay, and you can use the tray again if you have the phone. So this is a perfect finish. So, as you can see, there is a little of air here, but this air is not of this class.
This is because of that protective film that we have on top of this phone, so I'm trying to push ? as right. So I will show you if this is a thing or something okay, it's out. So, as you can see, it is a perfect finish yeah. So what we will do why we will take some risk. We will actually, they have mentioned to use the squeeze after removing this protective film, but I don't use that, because if you have an dust particle here, it will scratch your tempered glass too.
So it is your wish, but I will do it in this way like from Center to outside Center, to outside and from this Center to outside from here to so the same, so it is done now. We will remove this protective film voil?. So, as you can see, it is a perfect finish with perfect fitting, so the exact location there are no deviations or anyway, the glass is totally perfectly finished, see it is perfectly aligned. So, as you can now, you can see the glass it is perfectly aligned and all so, it doesn't feel like you are using any tempered glass or anything when you look at directly, and it is really clear display and the clear display is totally clear as you can see here. So this is what it looks after you install a tempered glass speaking temple gloss.
So that's all my friends. Thank you for watching this was the video to install sign, easy and perfect, with tray tempered glass screen protector for iPhone 10. Ah, thank you for watching. If you have any questions about this product feel free to ask in the comment section below and do subscribe, my channel, my friends I, need subscribers to make these kinds of contents. Thank you for watching bye, bye,.
Source : Ashutosh Thakur
Phones In This Article

Related Articles


Comments are disabled
Latest Articles


