Samsung Galaxy s20 Plus Back Camera Repair or Replacement & Loud Speaker By T&E Repair
Hey there everybody today we're going to be taking a look at this galaxy s20 plus our customer brought the phone in today uh with issues on the back camera and the loudspeaker. So that's what we're going to be replacing today on the phone now this customer, before bringing it into us, had actually taken it somewhere else to get the camera lens, replaced the camera lens on the phone. If it does get damaged over time, there can be dust buildup along the camera and that can affect the camera. Our customers, camera right now is looking really blurry. The image just doesn't look as clear. You know as you'd want it to, so we're going to go ahead and just replace that so right here along the edges, we've already gone ahead and preheated the phone uh.
You yourself can do it as well uh. As long as you have a heat gun, you could also use a blow-dryer like a hair dryer. So that way you can heat it up as long as it's a nice even heat, you should be good, but after you heat it up, just go along the edges. There is adhesive, so just go ahead and stick in a pry tool, sometimes a little of rubbing alcohol helps loosen it up as well. So just go along the edges, all the way around to make sure that it comes off all completely and there's no worry about having to break the back cover with the newer phones.
It's not all glass like the s8, plus all the phones before this one. This is actually a plastic case, so there's no worry about having to crack it. So just remember pry up evenly make sure that you get all the adhesive off so that way it comes off in one piece, and here we go we're just going to go ahead and separate that be careful, because sometimes there can be a couple of connectors that may come connected uh, and just so you know you don't damage one uh, you go ahead, and you know just lift very carefully, but as we could see here, all the adhesive actually came off in one piece. Nothing, you know got damaged, nothing, you know really needs to be replaced, so we could actually use that again. Uh, after doing that, the next step you're going to want to do is really important, you're going to want to go ahead and take out the sim tray that allows you to be able to, you know, take out the frame without having to your know, cause any damage to it.
If you take the sim tray out, first, the frame will come out easily and there's no having to go back, and you know take it out afterwards. So after that, we're going to go ahead and remove all the screws they're, not you know different sizes, they're, all the same they're all the same size. So there's no worrying about having to you know misplace the screw or putting a screw in the wrong hole. They're all the same, so just go ahead and take those off now it may look like a simple repair uh. If you do have experience, you know we have had seven years, we've been open for about seven years, and we've had a lot of experience.
With this, we've been working with some of the older models we've been working on the s3 when we first opened up, so we do have a little of experience on this. We've, like I said, worked on the s3 s4 and up uh. It may look like a simple repair, but sometimes it can get a little tricky if you're interested in getting it repaired. We have three stores here across the valley uh in Arizona. We have two one in phoenix one in south phoenix and one in Glendale.
You go ahead, pay us a visit. We go ahead and help you out as good as we can. Also, if you are within any of the 50 states of the U. S. , there will be a link down below in the description that you can go ahead and click.
If you're interested on you know doing the repair yourself, you go ahead, click that link, and we can go ahead and send you the part through the mail. So that way you can go ahead and do the repair yourself or, if you're, not feeling up to it. That's perfectly fine that same link as long as you click it. You can go ahead, you can send us your device, uh, send it to us through the mail, and we repair it within the first 12 to 24 hours so yeah. If you're interested go ahead, it only applies if you're in the US now here what we've already gone ahead and done.
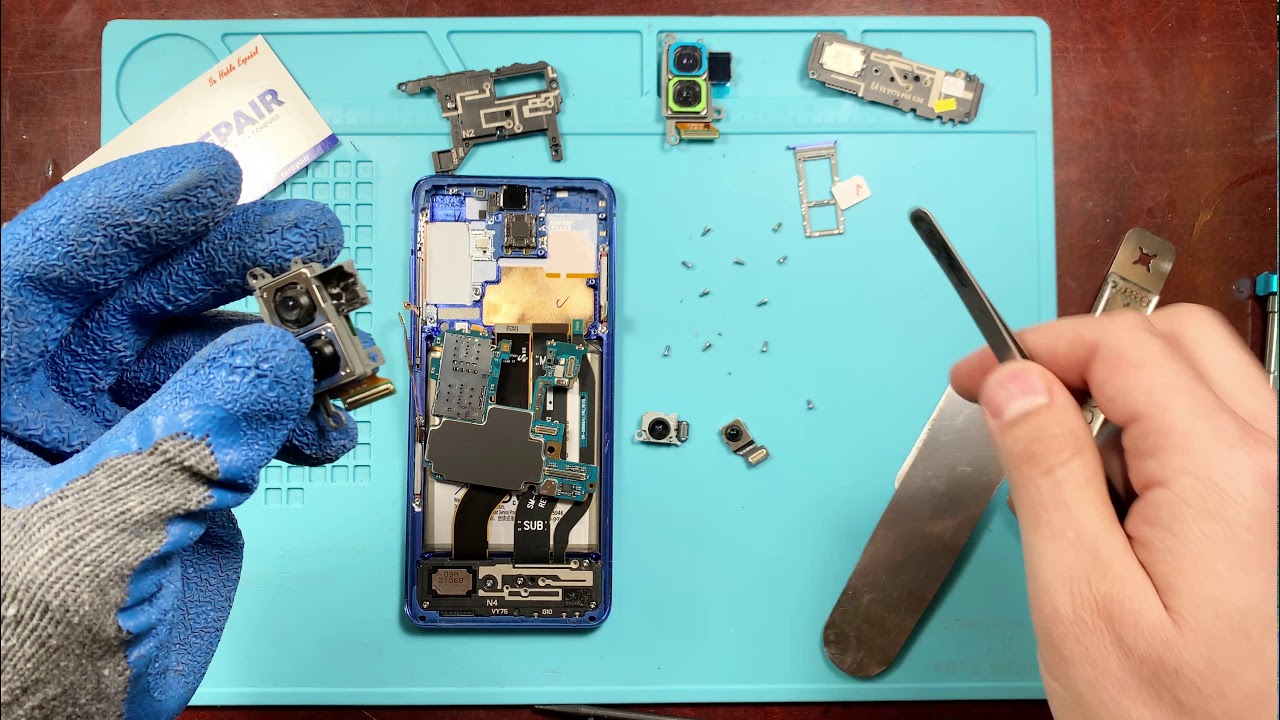
Was we've gone ahead and disconnected some flexes be sure that you disconnect each and every flex? Some of them are very small, so you might not be able to see them very easily and something that does help. You can count how many flexes there are just so you remember: okay, hey! This is how many flexes I need to reconnect. Once all of them are disconnected. The battery is disconnected. You can go ahead and take out the main board, and this piece is crucial.
This is essential. This is essentially the brain of your phone. This is how the phone functions so be sure not to damage it. We're just going to go ahead and flip it around. There's four connectors for the camera, but we're only going to be disconnecting two of them.
We only need to re or install two new cameras. Uh, it's not gonna, be all four, so we're just going to go ahead and disconnect the two essential ones that we need to repair. You can use a pry tool, just be very careful, very gently, because if you do damage the main board, like I said that is you know what makes your phone function that is essentially where all of your data is at okay right here, we've already gone ahead, the two cameras that we're not going to be replacing we're just going to go ahead and take it out, since they do sit in the bracket where the new camera comes in, so we're just going to go ahead and peel back some plastic. That's over the adhesive just so the cameras stick well in place. The new cameras do come with a small piece of plastic over the front of the camera, be sure to take that off before fully installing it.
The plastic is just there just in case. You know if you accidentally touch it, you don't smudge it. You don't leave any fingerprints on it, so just be sure to take that off before you fully install it because then, if you don't, it's going to be a hassle and then just simply when reinstalling the cameras be sure that you line up the connectors uh be sure to you know, feel a little of a click. It's going to click, and you're going to feel it fall into place. If you do line it up correctly.
If, for whatever reason you don't force it in because you can cause damage to the board and then afterwards, that's going to be an even bigger repair to do all righty, so just make sure that they are all perfectly connected just a little of pressure on there and then don't forget to reattach all the other cameras. The other two cameras are disconnected, so we're just going to go ahead and put those back into position like I said it is a fairly simple repair to repair that can be done same day if you're interested feel free uh. There will be, you know, links and everything down in the description below. If you have any questions, feel free to contact us uh, our estimates are, or the diagnostics are free, uh, so yeah, if you're anywhere in the phoenix area, feel free to come into any of our three stores, we're more than gladly likely to help forever all right and then once that's done, we're just going to go ahead. Be sure that no connectors are underneath your main board uh be sure that all the connectors you know you're able to see anything that has to be reconnected.
You reconnect properly and remember. If you don't remember exactly how many connectors there are at the beginning of it, you can go ahead and just count them down. So that way, you remember how many connectors you have to reconnect, so the board just goes into place where it's supposed to right. There just start off by reconnecting everything, and once that's done, everything should fit into place. Uh, if you do feel like something is not fitting like it's supposed to don't force anything as you can cause more damage to it, it is going to fit into place as long as you put it back the right way.
So now that we've gone ahead and replaced the back cameras, we're going to go ahead and replace the loudspeaker. Now, our customer, when he brought it in uh, was saying that it sounded like it was very stat icky uh. That issue could possibly have been. Maybe if the phone came in contact with liquid uh that could have caused damage to the loudspeaker, so we're just going to go ahead and replace that so just go ahead. Unscrew it you can get a little pry tool.
Just to you know, go along the edges uh. It should pop out on its own uh. Just don't force it a lot, and now here we have our new speaker, we're just going to go ahead and place that in you should, you know, feel it does have clips along the side. So you should feel it clip into place after that's done, you're just going to want to go ahead and screw it in just to give it a little more security. Now remember like I said you know if you are feeling up to doing it by yourself, go ahead.
Click that link down below uh. As long as you are within any of the 50 states of the US, we can go ahead and send you the part through the mail or, if you don't feel up to doing it yourself, you can go ahead and send it to us like. I said, the repair usually takes about 12 24 hours when it gets to us. So that way we go ahead and repair it, and then we send it back to you once it's you know fixed so yeah if you're interested go ahead. Click that link down below also, if you could give a like give a comment, tell us what you like to give us some feedback.
It does help us put up more content like this, and it also you know, lets the word get spread around for people who might have a device that is uh. You know something might be wrong with it. It might be broken and if they don't know where to go or what to do you know it helps us a little uh in spreading the word around so that way they can get that device back up and running as good as it can so yeah go ahead. Click that, like button yeah, you know, leave a comment. It would really help a lot so right here afterwards, uh we're just going to go ahead, since none of the old adhesive had to really be taken off.
It's still good, so just make sure that the frame is nice and clean, just realign everything and just put a little of pressure on it, and then that should be it. Furthermore, it should be completely glued down to the back of the frame. So yeah, if you have any questions like I said, feel free to leave a comment down below. Let us know what you think of the video: it really helps out a lot.
Source : T&E Repair
Phones In This Article

Related Articles


Comments are disabled
Latest Articles


