iPhone 12 (Pro) The Ultimate Camera and Photo Settings Tutorial | IOS 14 By MountMedia
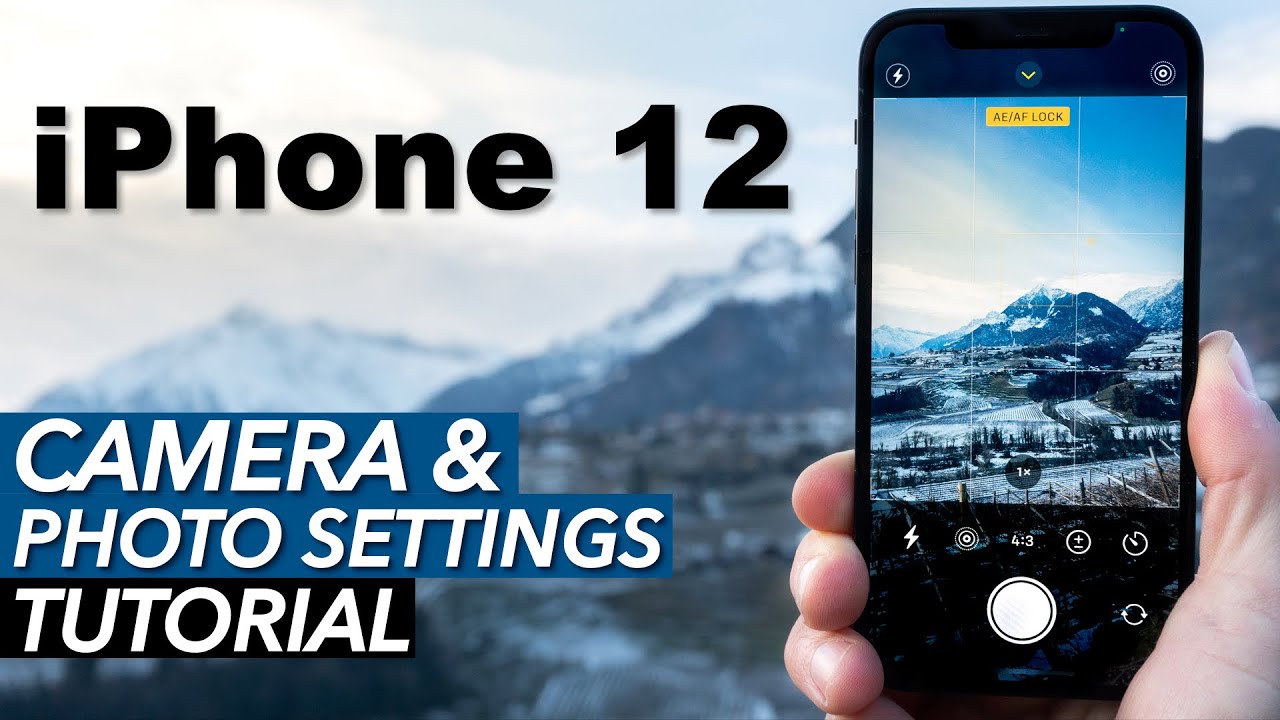
I am always surprised what great photos you can get with the camera of an iPhone. In this video I will show you which settings are available in the camera app of your iPhone. I will show you what you can use the different features for and how you can get optimal results with your iPhone. Many of the features of the camera app of your iPhone are self-explanatory, but there are so many interesting things to discover that I am sure the following minutes will be worth your while. Today I will concentrate on the photo settings. For the video settings there will be another video.
And in case you are new here, my name is Werner, I live in the Italian Alps and on this channel I do reviews and tutorials on consumer cameras. Consider subscribing to the channel if you are interested in these topics and have fun with this video! You can open the camera app in different ways: Of course by tapping the app icon, in the control center you will find it in the lower right corner, from the lock screen by swiping to the left or by pressing the camera icon, and also by using Siri. Open Camera When you start the camera app, you will see the last image you captured in the lower left corner. If you tap on it, you can view your images and make adjustments. We will take a closer look at this later.
In the middle there is the shutter button and with this little circle of arrows on the right you can switch between the back camera, which is your main camera, and the selfie camera, which is the front camera. In the line above you can switch between the different modes. On the right there are the three photo modes Photo, Portrait and Pano, on the left you find the three video modes Video, Slo-Mo and Time-Lapse. While photo and video are self-explanatory, you can use Portrait to create a blurred background. Until recently, such an effect could only be achieved with bigger cameras.
Although this actually also works with objects, the mode is called Portrait, because this effect is especially well suited for portraits. In Panorama mode you can capture images with a field of view that is much wider than the camera lens would actually allow. This is especially suitable for landscape photography, for example. In Slo-Mo mode you can capture slow-motion shots, and in TimeLapse mode the camera captures images at certain intervals, which are then merged into a video file. For example, you can capture passing clouds and capture the progress of time.
But as I said, today we are talking about the three photo modes. First let's take a look at the shutter button. If you want to take a simple photo, of course you tap the shutter button briefly. You can achieve the same result by using the volume buttons. It makes no difference which of the two buttons you use.
If you want to quickly capture several photos in a row, you can swipe the shutter button to the left. Now your Iphone will capture photos in an extremely fast sequence until you lift your finger. This is called the Burst Mode. But why would you do that at all? Maybe it comes to a very important moment, like a race, and you want to capture just the right moment. So you can then choose the perfect photo from a large number of photos.
By the way, in the settings you can also set the Burst Mode to be activated by using the Volume Up button. This would be especially interesting if you want to use this mode frequently. If you press and hold the Shutter button, the Iphone automatically starts to capture a video clip. The recording ends as soon as you release the Shutter button. This way you can quickly capture a video without having to switch to video mode first.
Apple calls this QuickTake. If you want to capture a longer video then drag the shutter right onto the lock. Now the Iphone will continue recording the video even if you release the shutter button. You can stop recording by tapping on the record button again. While capturing the video you can also continue to take pictures by tapping on the shutter button that appears on the right.
You can also start recording a QuickTake video by pressing and holding one of the two volume buttons. Now let's take a look at the zoom. Normally you will see a small 1x right above the menu bar. This indicates that your Iphone is currently using the main lens. If you tap on the 1x the Iphone lens changes.
Now it says 0.5, which means that the iPhone is now changing lens or basically camera. It now uses the ultra wide lens. The field of view is now much wider. Depending on your Iphone you can also select the third camera or the third lens and a 2x or 2.5x will appear. This stands for the telephoto lens.
There is one thing you should keep in mind. Even if it does not look like this on the display, the different lenses have different technical properties. The main camera has the widest aperture and can therefore achieve better results especially in low light conditions. If you now tap and hold the number, a kind of zoom slider appears and you can swipe left and right to zoom in and out more precisely. For this tutorial I use an iPhone 12, so you can only see 0.5, 1 and 5 as numbers.1 stands for the main camera. As you can see, the main camera has a lens that is equivalent to a 26mm lens on a full frame camera.
The ultra-wide lens is equivalent to 13mm. Everything above 1, on the other hand, results in a digital zoom, which basically leads to a decrease in image quality.5x, so a 5x zoom is the maximum on the iphone 12. You can further zoom in on the image in editing. You can also zoom in and out by using two fingers. In this case you can always read the current zoom factor here.
If you want to capture a picture with your Iphone, you will of course determine the framing on the display. So what should be on the picture, how should the picture composition look like. Basically the framing of your picture will correspond to this outer frame. Interestingly, if it is bright enough, you can see a larger area at the top and bottom of the frame. This exceeding part is slightly darkened.
On the iPhone 11 this shaded part could be captured and used in the editing process to adjust the framing of the image. Since IOS 14 this is no longer possible. The dimmed part should only help you to find the optimal framing. For the right composition the grid also helps you. So you can stick to the Rule of Thirds, for example, which is important for a good composition.
You can deactivate the grid and also the dimmed area outside the frame in the settings. In addition to the right framing, focus and exposure are crucial for a perfect photo. The iPhone's camera usually adjusts focus and exposure automatically and does an excellent job. Faces are recognized perfectly. You can see this by the yellow frame that appears when the camera detects a face.
And actually, with the iphone you can also get a blurred background or foreground naturally, for example when you capture objects in the near foreground and the background is far away. So it is quite possible that certain areas of the image are in focus and others are not. Therefore it can sometimes be necessary to adjust the focus manually. You do this by tapping on the object or person in the image that should be in focus. Now your iPhone also adjusts the exposure to the new focus.
You can also correct the exposure. You do this by tapping on the sun next to the focus square and swiping up or down. Upwards the image becomes brighter, downwards it becomes darker. You can also fix the focus and the exposure. Suppose you set the focus and/or the exposure manually and want them to stay locked even when you move the phone.
You can do this by tapping and holding on the appropriate area. Now the AE/AF Lock sign appears in yellow at the top. You can now move your phone without changing focus and exposure. This can be useful for example if you want to change the framing after setting the focus. Apart from these basic functions there are a few additional settings and features.
And you can open the corresponding menu in two different ways. By using the arrow at the top in the middle or by slightly swiping up with your finger. Instead of the different shooting modes, you will now see a series of icons that stand for different features. The icons at the top of the screen indicate which of these features is currently active. On the far left you will find the flash.
You can set it to automatic, on or off. Notice how the flash symbol at the top of the screen changes. Right next to it you will find the symbol for the Night Mode. The Night Mode will dramatically change the results in low light conditions. Normally the Night Mode will activate automatically when it is very dark.
You can recognize this by the fact that the NightMode icon at the top turns yellow. In NightMode your IPhone uses longer exposure times. Depending on how dark it is, your iPhone will need a shorter or longer exposure time to get a good result. You can see the duration of the automatically set exposure time right next to the icon, for example 5 seconds. During the exposure you should hold your iPhone as still as possible.
Above the Shutter button a timer appears which counts down the remaining time. If you shake or move the iPhone, the device will recognize this and two crosshairs will appear, one yellow and one white. You should move the iPhone in a way that the yellow crosshair lies directly on top of the white one. This helps to reduce movements and you can get a better result. You can also change the exposure time yourself by tapping on the Night Mode icon and moving the slider to the left or right.
By moving the slider all the way to the left you can also disable the Night Mode. Interestingly, a longer exposure time does not lead to a brighter result. It makes more sense to increase the exposure time when your iphone is on a tripod. There will be no movement and you can achieve optimal results. However, if you want to adjust the exposure and brightness of the image, you can do this by moving the sun icon up or down.
By the way, if you are interested in which MiniTripods or other accessories I use for my iPhone, check out the links in the video description. The next icon to the right refers to Live Photos. Here, too, the automatic is normally active. You can also turn LivePhotos on or off permanently here. With LivePhotos your iphone captures a clip of one and a half seconds before and after the photo was taken.
Therefore a short video clip of three seconds is created. You can watch this miniclip by tapping and holding on the screen while viewing your photo. You can change the so-called Key Photo within your clip and you can also add cool effects to your Live Photo. We will have a look at this in a moment. You can also tell that your iphone is capturing a Live Photo by the yellow Live icon at the top of the screen.
With the icon to the right of LivePhotos you can change the aspect ratio of your photos. A normal photo sensor delivers a photo in a 4:3 format. You can also set a square aspect ratio or a 16:9 aspect ratio which is more typical for video recordings. You should not forget that you can also change the aspect ratio when editing your photos. Right next to it there is a very important feature, the Exposure Slider.
With it you can make your image brighter or darker, that means you can overexpose or underexpose your image a little bit in relation to the settings of the automatic exposure control and this for a maximum of 2 stops. With this feature you can make smaller and more precise adjustments and you have a little more control than with the adjustments made by using the sun icon. In addition, the exposure correction will be kept and will stay the same if you take more photos. I have to say that the automatic of the iPhone protects so-called highlights very well and there are hardly any overexposed areas in the picture. So for such cases you hardly need any exposure correction.
It's more that you might want to capture a darker or brighter image to capture a certain mood. The next icon is a timer. This allows you to set that the image is not taken until three or ten seconds after pressing the shutter button. This can be useful if you want to take a group selfie and place your iPhone on a tripod or even in the dark with longer exposures if you want to avoid any shaking. On the far right you will find the icon for the different image filters.
The colors, contrast, white balance and also the saturation are changed. There are Vivid, Vivid warm, Vivid cool, dramatic, dramatic warm, dramatic cool, mono, silvertone and noir. Whether these filters are beautiful is of course a matter of taste. Keep in mind that you can add exactly the same filters later when you edit your image. Before we take a look at the portrait mode, I would just like to point out that you basically have the same functions when using the Selfie camera.
For example, there is also the night mode or live photos. What there is not, is a real zoom function. You can only zoom in or out a little with the two arrows or by using two fingers. Also interesting is that the Selfie-camera shows you a mirrored image in the preview, but captures the image without mirroring it. The image looks different than the preview.
If this bothers you, you can change this in the settings. When capturing selfies, remember that you can use the volume buttons as shutter. This is especially useful here. If we now switch to portrait mode, we find the usual settings for flash, exposure correction, timer and filters in the functions menu. The night mode and LivePhoto are not available here.
However, there are two new settings here, different portrait lighting effects, which you can select here by swiping to the left and right and the F-Stop or Depth Control as Apple calls it. As explained in the beginning, in portrait mode your iPhone creates a blurred background, as if you had taken the picture with a Mirrorless with a fast lens. In general, the smaller the number of the F-stop the stronger the effect will be, that means the blurrier the background will be and the larger the number the smaller the effect will be. Just like it would be on a bigger camera. Basically the feature works incredibly well.
Only on protruding hairs you can sometimes see small defects. As already mentioned the portrait mode also works with objects. But especially with objects you have to make sure that there is an appropriate distance between camera and object to activate the feature. The camera tells you this at the top of the screen. And the Portrait Lighting is also a great feature.
It is designed to simulate professional lighting techniques. If you've been into photography, you'll know that a good lighting often makes a bigger difference than the actual camera. You can select different lighting effects by swiping to the left and right. You can also see the effect in the preview. With Studio Light the face is well exposed by a soft light.
It reminds you of a beauty filter, with Contour Light the external areas of the face or the object are darkened a bit. This gives the picture a little more depth and drama. With Stage Light the subject is isolated in the spotlight. The outer area is completely darkened. Stage Light Mono creates the same effect in black and white and Stage Light High Key does not darken but lightens the outer area, for example like a portrait against a white background.
If you find the effect exaggerated or too weak, you can adjust the intensity. In the functions menu tap on the Portrait Lightning icon and now you can adjust the effect by dragging the slider to the left or right. Also note that you can change and adjust the Portrait Lightning and F-Stop when editing your portrait. With the Panorama mode you can capture an extremely wide field of view. As the name suggests, this is great for capturing landscapes or even cityscapes.
Because of the ultra wide lens this feature may have lost some of its importance. Nevertheless, it still produces results that would not be possible with a simple shot. Basically, several images are combined. To do this, start recording and move your camera along the arrow from left to right. If you tap on the arrow you can also change the direction and capture the panorama from right to left.
Make sure that the arrow is moving along the yellow line during the recording. If you do not succeed, you will see unsightly waves in the image. Apart from that there are hardly any settings in this mode. You can change the lens and that's it. Now let's have a quick look at the editing tools.
If you tap on the small image of your last shot in the lower left corner, you will see your last image in full size and can edit it in many different ways. Today I will only give you a brief overview and point out a few important things. Editing photos on the iPhone would be the subject of a separate tutorial. If you swipe through your last photos, you can see in the upper left corner if your photo is a portrait photo or a live photo. If not, this area remains blank.
This is important because portrait photos and live photos allow different editing steps. Generally, the editing menu opens by pressing edit. With the first icon on the left you can make basic adjustments to the photo. You can adjust the colors, exposure, white balance, saturation, sharpness and so on. With the second icon you can apply a filter.
These are exactly the same filters that we saw in the capture settings. And by clicking the icon on the right you can rotate, crop or adjust the format of the photo. If it's a live photo, you can also change the key photo and the duration of the shot by clicking the first icon on the left. If you swipe up in the main window, you can add some cool effects to the live photo. You can add a loop to repeat your shot continuously or bounce to repeat your shot alternately forwards and backwards.
I find Long Exposure especially interesting. This simulates a long exposure. This works well with moving lights or for example with water. If your shot is a portrait, as mentioned before, you can use the editing tools to change the portrait lightning and the depth of field, that is, the F-stop. Now let's have a look at a few important settings of the Camera App.
With preserve settings you can for example set the camera to remember certain settings. For example, you always want to use the same filter or the same exposure correction or you always want to start the app in video mode. Also interesting is that you can disable certain intelligent capture features of your iPhone here. With Scene Detection your iPhone detects what you capture and automatically applies the appropriate look. Using prioritise faster shooting, multiple photos can be taken more quickly by repeatedly pressing the shutter button.
The ultra-wide lens and the front camera create unattractive distortions. They are automatically corrected and removed. Using Smart HDR, your camera captures images with different exposures and then combines them into one photo. This is especially important when the scene contains very bright and very dark areas. This way you can preserve details in the very bright and very dark areas.
This can prevent, for example, very bright areas in the image from burning out. Personally, I consider all these features to be advantageous and therefore leave them activated. And with this I want to say goodbye for today. If the video was interesting or helpful for you, give me a Like as feedback. If you want to support this channel you can use the link in the video description to buy me a coffee.
There will be more videos about the IPhone 12. So stay tuned and see you next time!.
Source : MountMedia
Phones In This Article
Related Articles

![[Hot News] HTC U11 Review](https://img.youtube.com/vi/_GBO7g-7ZQE/maxresdefault.jpg )


Comments are disabled
Latest Articles


