How to Use & Edit Apple ProRAW for iPhone 12 Pro - Beginners Tutorial! By Trending Reviews
Right so apple just released iOS 14.3 recently and alongside that was the ability to now take photos using apple pro raw. Currently, it's only available for the 12 pro and the 12 pro max models. I have 12 pro, so I'll, be taking some pictures using this to update and enable this first, you need to update your phone to iOS 14.3. Then you go into settings you scroll down into camera. The first option in the list is format, so you select that, and you'll see at the bottom. There photo capture apple pro raw, just enable this and turn that on, so then you open up your camera you'll see on the top right hand, corner you'll, see raw is currently disabled.
If you tap that it will be enabled, and then you can start taking pictures using apple pro raw. Just to let you know, this is only available on photo mode for both back and front cameras. You can't use it on portrait mode or any other mode. Now, if you're new to photography in layman's terms, a raw photo is an unprocessed image taken directly from the center of your camera lens. Without all the additional software processing, that's layered, on top of it, to make your images more exposed, more vibrant, more sharp, leaving you with less flexibility to make color grading adjustments yourself.
An apple pro raw image, however, is slightly different to other standard raw images whereby they still add a small amount of processing for rendering HDR, deep fusion or night mode. On top of the photos, the format of the images will be the dot, ROG standardized format of raw image data. The good thing is: is that most photo editing applications accept importing of this file type to make adjustments, so once you're done, you can export to JPEG and then share it to all of your social media. So now, let's take a look at some sample raw pictures that I've taken using my iPhone 12 Pro and edit it using Adobe Lightroom all right guys. The first step is to transfer the raw images from your iPhone to your computer.
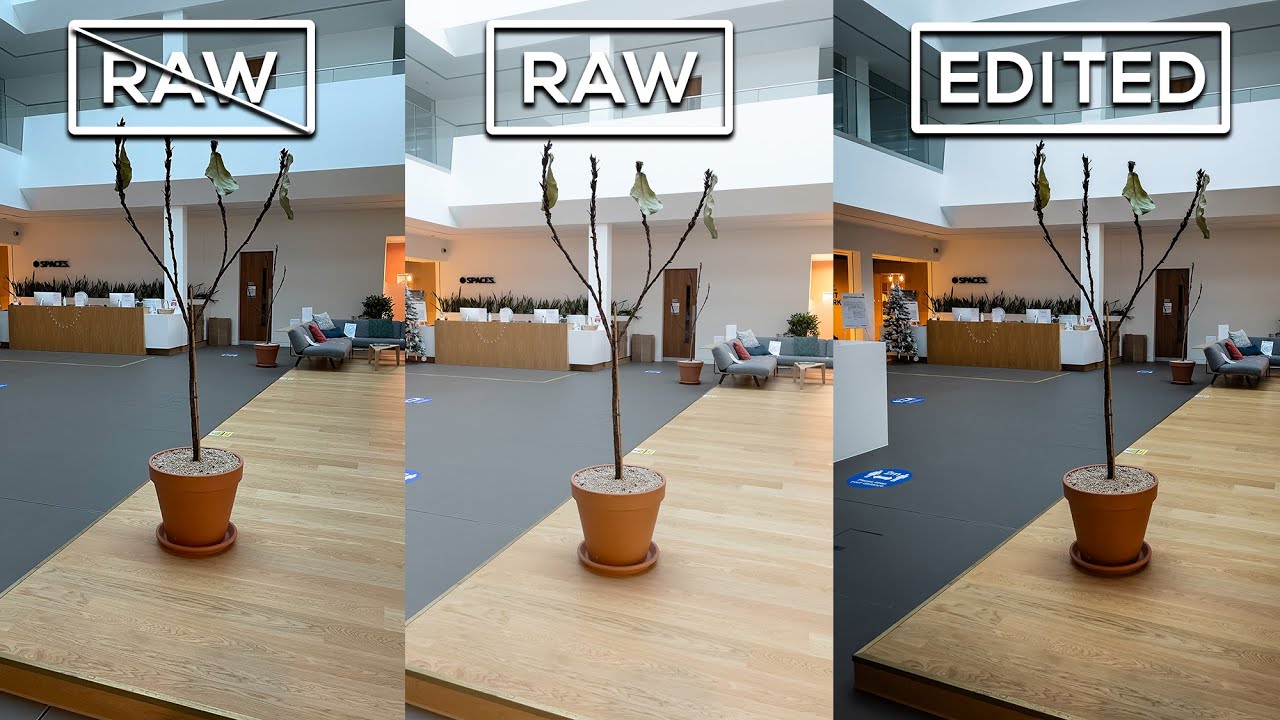
So the way I do that is, I currently use ICL photos. All I have to do is select the raw ones, which I know are the second ones of each image. I've taken here I'll just select them like so and then, when you go to export, make sure you don't export them as just a general export, they will be transferred as JPEGs. You need to do export unmodified, originals and that will transfer the ROG files to your MacBook, so once you've done that you can export it and save it to a folder. Now, just before I start to edit any of the raw images, here's a side-by-side comparison of one of them.
The left-hand side is the non-raw picture and the one on the right-hand side is the ROG raw file. So you can see it's a bit darker, it's duller, and I'll have more flexibility to brighten. It myself make it more vibrant, make the red in the car color pop a little more. So I just wanted to showcase you guys. The difference between the non-raw and the raw files, and I'll be showcasing a bunch of examples after I've edited this one specifically.
So the first thing you will need to do is go into an editing application. There's many out there that you can use, for example, purposes. I will use Adobe Lightroom I'll go into my raw images and I will load my ROG file. So here I will take my first one, and I will add that to the library and start playing around with editing it. So, as you can see it's pretty dull, I'm going to play around with the exposure, you can change the contrast now.
The reason you would do this is so that you as a photographer, would have so much more flexibility in making the images stand out in the way you want it to, rather than the way the iPhone 12 Pro will process it for you with. So that's great to have as well, and this does take time, but you can copy your edits in every picture and then make relevant adjustments. So I'm just going to make some examples here you go once you're ready. All you can do is export, and generally I would export the raw files as JPEGs so that it's easier for me to share in various different locations. So I will now export this as an edited version of the raw image there we go and that's the end-to-end process, it's very straightforward from taking a raw image on your phone, transferring it editing it and then exporting it ready to use elsewhere.
So it's pretty straightforward, but if you have a whole host of images to do, then it might take some time, but for the most part, if you are going to be using editing applications to do this, then this is the process. So here are some examples of me taking a lot of images, and I'm going to compare that with the raw image file and the edited raw image file using Adobe Lightroom. So let's go ahead and take a look at a few, more examples uh. So that was the tutorial guys. My final thoughts, why would you want to use raw images in all honesty as a beginner, unless you're really interested in manually, editing or color grading? Your photos, then using raw images would be great for you, but for the most part the standard photos will do a good enough job.
To give you a great looking photo with the inbuilt software processing for your iPhone 12 Pro or 12 pro max raw images on their own will look bland and basic, and they're generally made specifically for photographers who want to gain the flexibility for a better post, editing experience. So that's it guys if this was useful, make sure you hit that, like button, make sure to subscribe for more useful, iPhone tutorials. I have coming out in the near future and I will catch you guys next time take care.
Source : Trending Reviews
Phones In This Article

Related Articles


Comments are disabled
Latest Articles


